Have a Question?
How to Install OPNsense as a VM on Proxmox VE
Overview
OPNsense can be installed and utilized on Proxmox VE as a virtual machine (VM). This guide will cover basic installation and configuration to get OPNsense operational on Proxmox VE.
In this example, we will be using OPNsense version 22.1.2 and Proxmox VE version 7.1.
*Note: Although an OPNsense virtual machine can be successfully installed on the FW2B, FW4B or FW4C, the performance will be lower when compared to running the VM on our other products. If you wish to use OPNsense on an FW2B, FW4B or FW4C, it is recommended to install the operating system as a bare metal firewall rather than running it as a virtual machine on Proxmox VE.
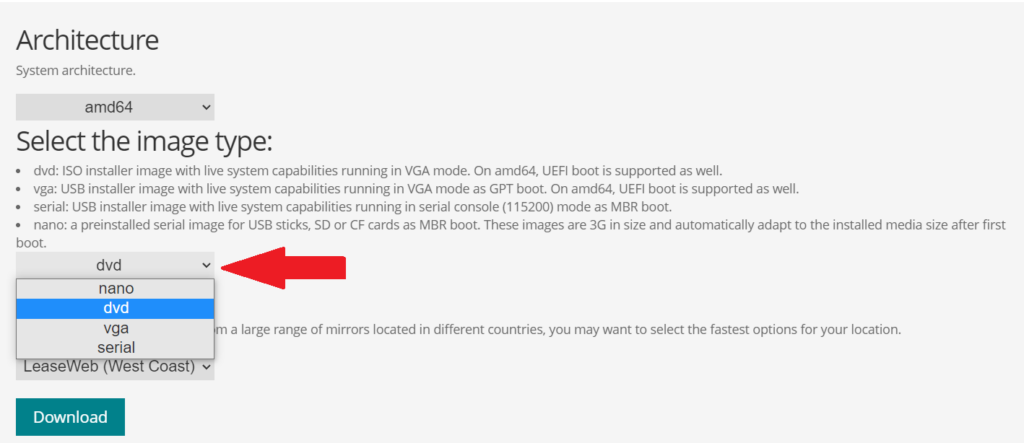
Downloading OPNsense ISO
Navigate to https://opnsense.org/download/ to download the ISO image for OPNsense. Ensure the DVD download is selected.
After the ISO has been downloaded, it will have to be uploaded to Proxmox VE before installation.
Uploading the ISO to Proxmox VE
- Login to Proxmox VE via a web browser.
- On the left-most dashboard, expand the ‘Datacenter’ and server node dropdowns.
- Select local storage, select ‘ISO Images’, and click ‘Upload’
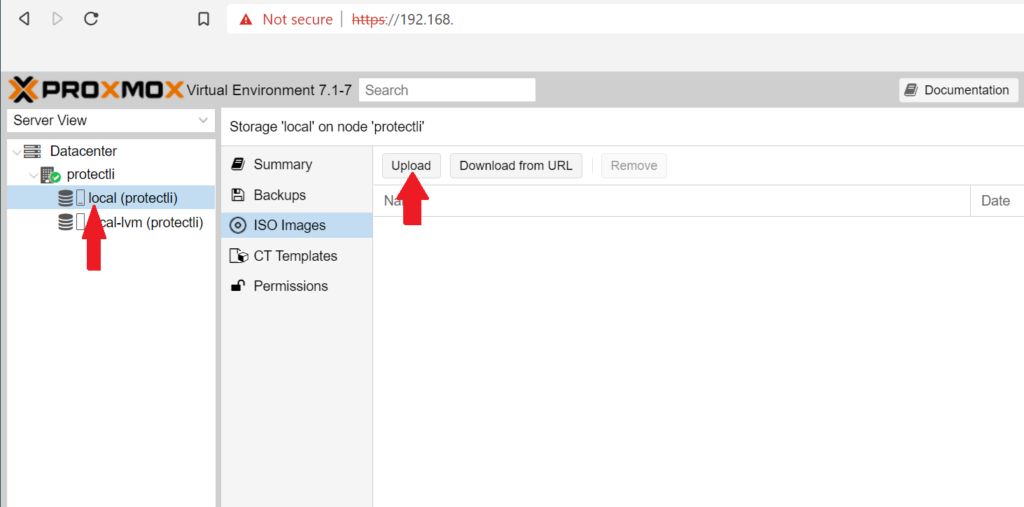
- Click ‘Select File’ and select the OPNsense ISO, then click ‘Upload’
Before creating the VM, network interfaces must be assigned to Linux Bridges.
Creating Linux Bridges to Use As Network Interfaces
A Linux Bridge is used to bridge VMs to a physical network device. For example, an ethernet cable connected to the Vaults network port will need a Linux Bridge in order to allow VM network traffic.
By default, Proxmox VE will create Linux Bridge ‘vmbr0’ connected to the WAN port (port 1).
Here at Protectli, we use the default Linux Bridge 'vmbr0' as a Proxmox VE management port and create a second Linux Bridge 'vmbr1' to act as the WAN, this separates Proxmox VE GUI from the public-facing internet. We will also create Linux Bridge 'vmbr2' to act as a LAN port to access OPNsense GUI. This configuration requires 3 ethernet cables plugged into the Vault.
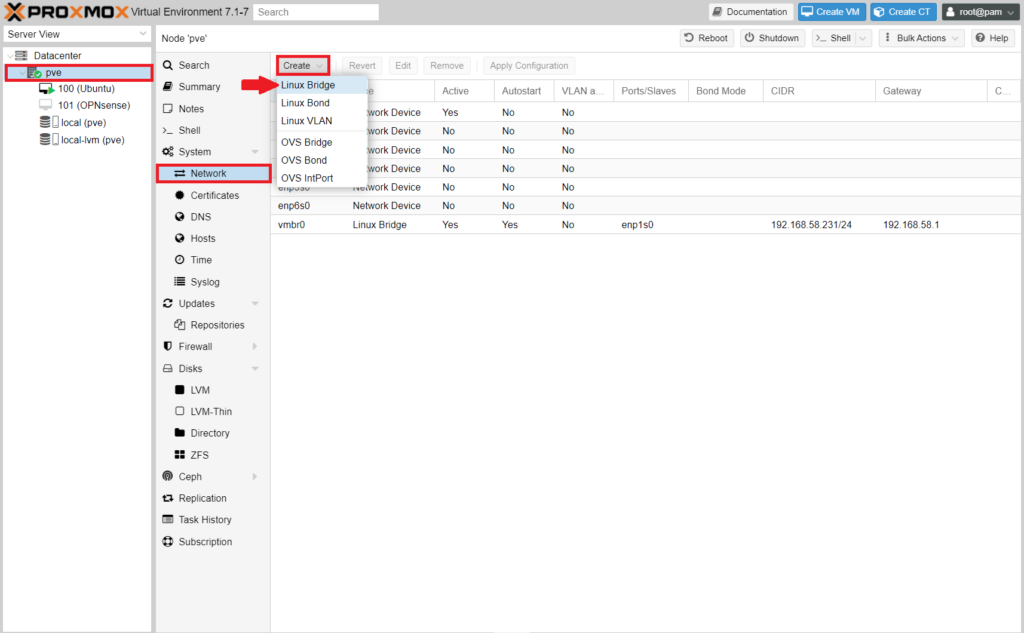
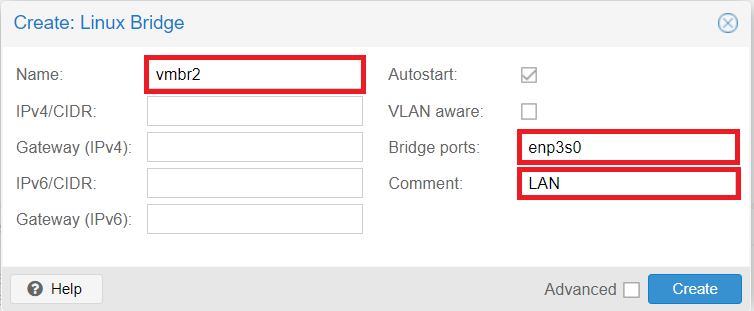
- On the Proxmox VE dashboard, select the server node. Select System > Network
- Click 'Create' and select 'Linux Bridge'
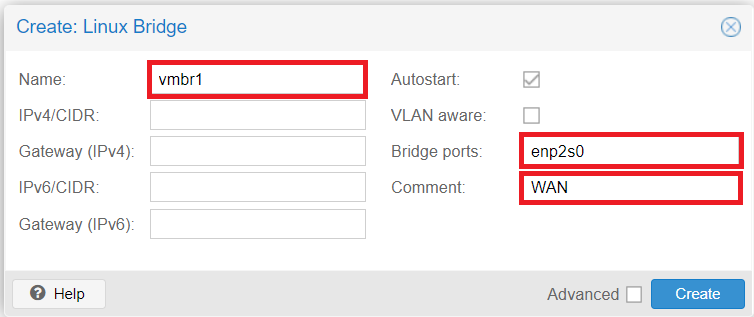
- Name the interface, and designate a Bridge port. (The Bridge port must be named after a physical port)
- In this example, vmbr1 will bridge with enp2s0 to act as our WAN
- This will be connected to the modem's ethernet port
- We will bridge vmbr2 with enp3s0, this will act as our LAN
- Connecting this ethernet cable to your PC will allow access to OPNsense web GUI
Now the Linux Bridges are configured, the VM can be created
*Note: If your Vault is capable of PCI passthrough (VT-d), you can assign the network ports directly instead of creating a Linux Bridge. IOMMU must be enabled for PCI passthrough, it is enabled by default on Proxmox VE version 7.2. More information can be found in our Knowledge Base [Here].
Creating a VM
For basic VM creation use the following configuration, leaving all unspecified fields at their default values.
Click ![]() located at the top right of the web GUI
located at the top right of the web GUI
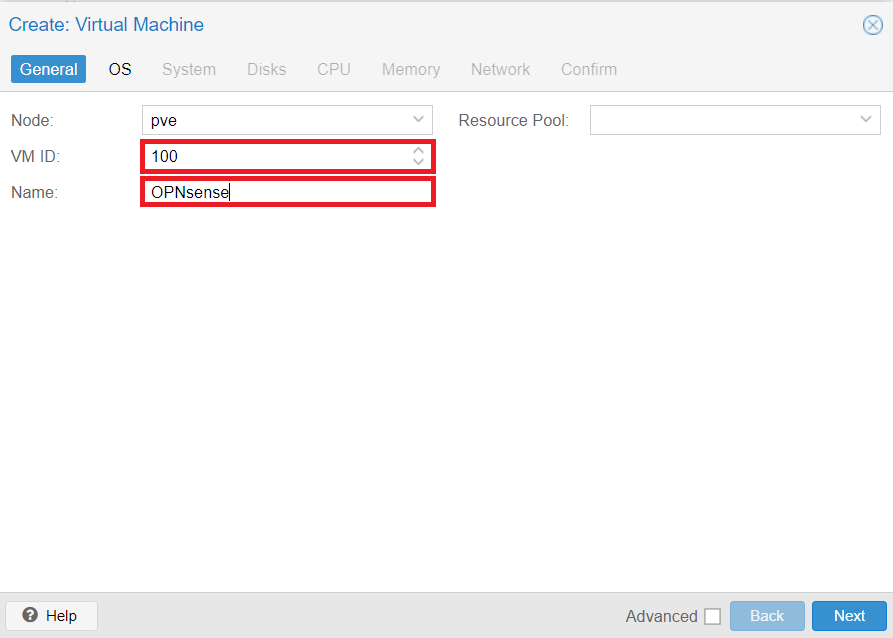
- In the 'General' tab:
- Choose a VM ID and a Name for the VM.
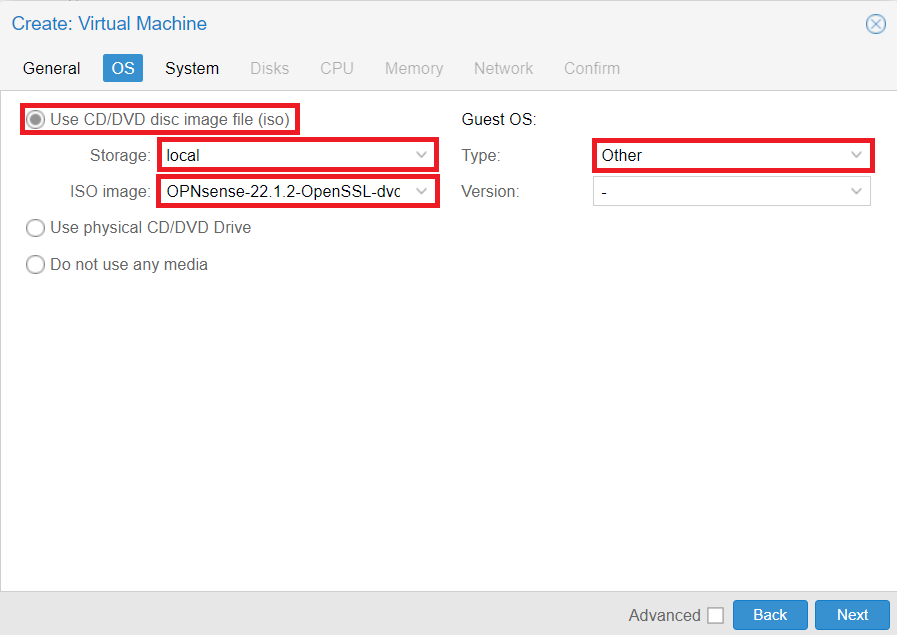
- Continue to the OS tab:
- Select 'Use CD/DVD disc image file(iso)'
- For Storage: leave as the default (local)
- For ISO image: select the OPNsense ISO that was uploaded earlier
- For Guest OS Type: select 'Other'
- Continue to System Tab:
- Leave defaults as shown below

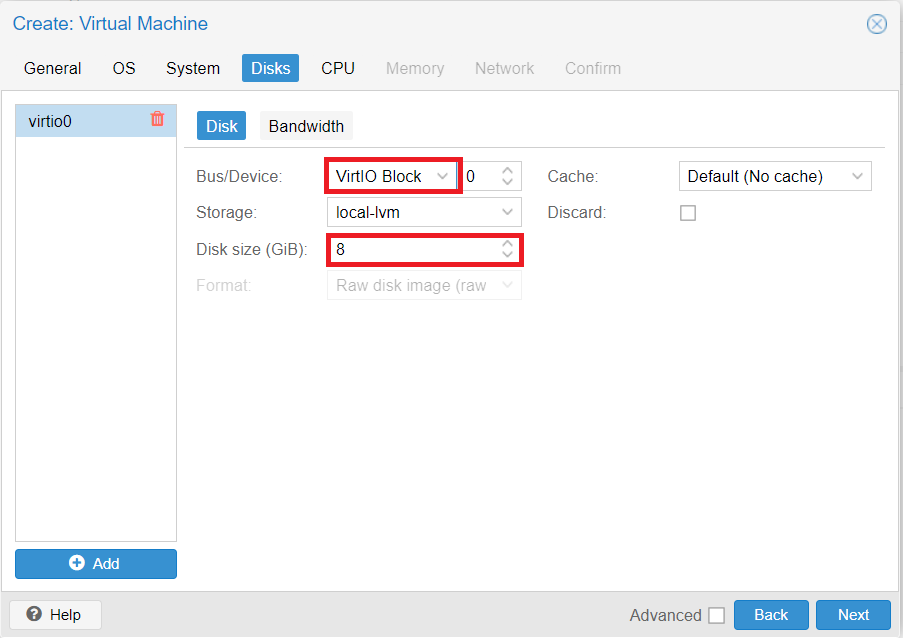
- Continue to Disks:
- For Bus/Devices: select 'VirtIO Block'
- For Disk size (GiB): select at least 8GB.
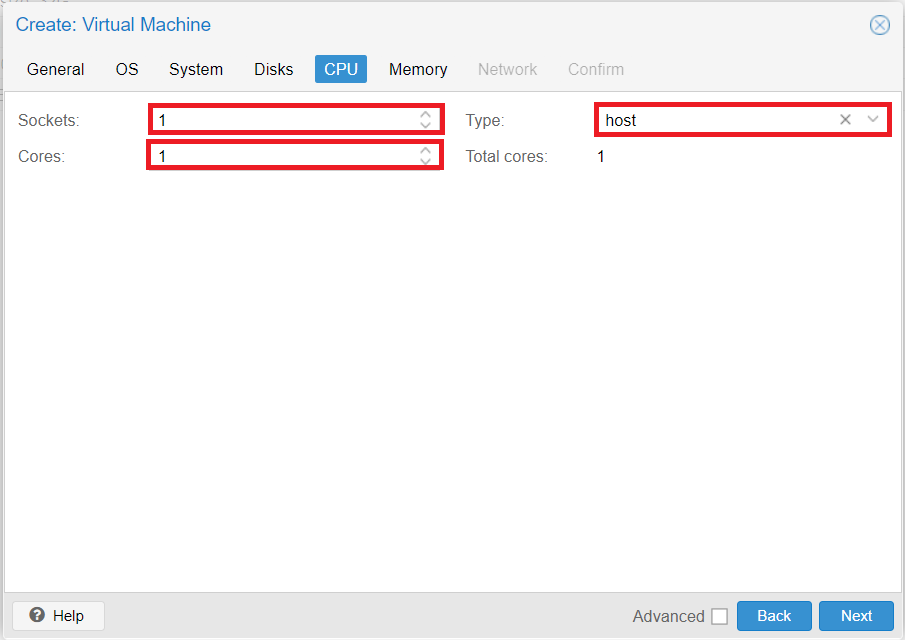
- Continue to CPU tab:
- For Sockets: select '1'
- For Cores: select at least 1
- For Type: select 'host'
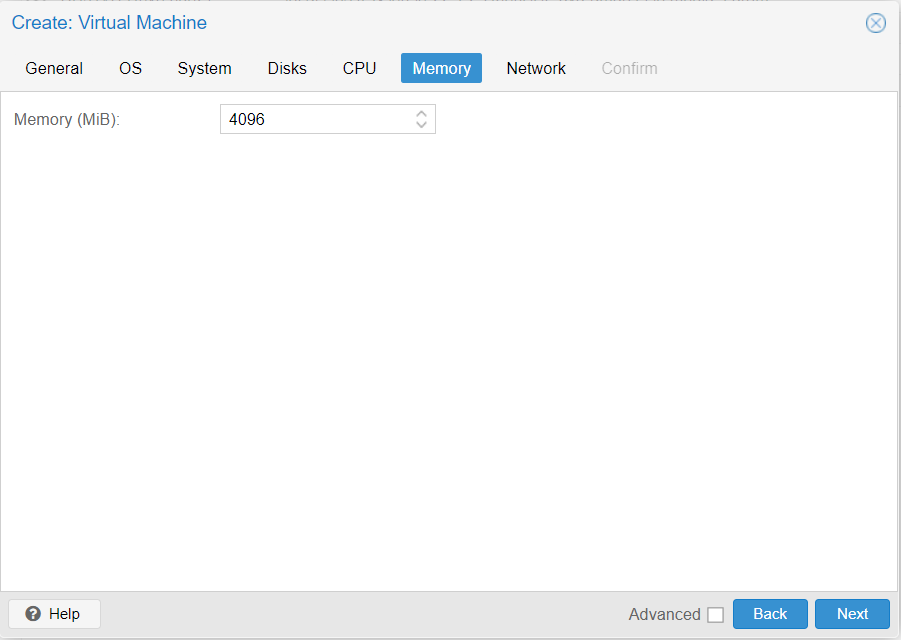
- Continue to the Memory tab:
- For Memory (MiB): select at least 1024MiB. We use 4096MiB (4GB) in this example.
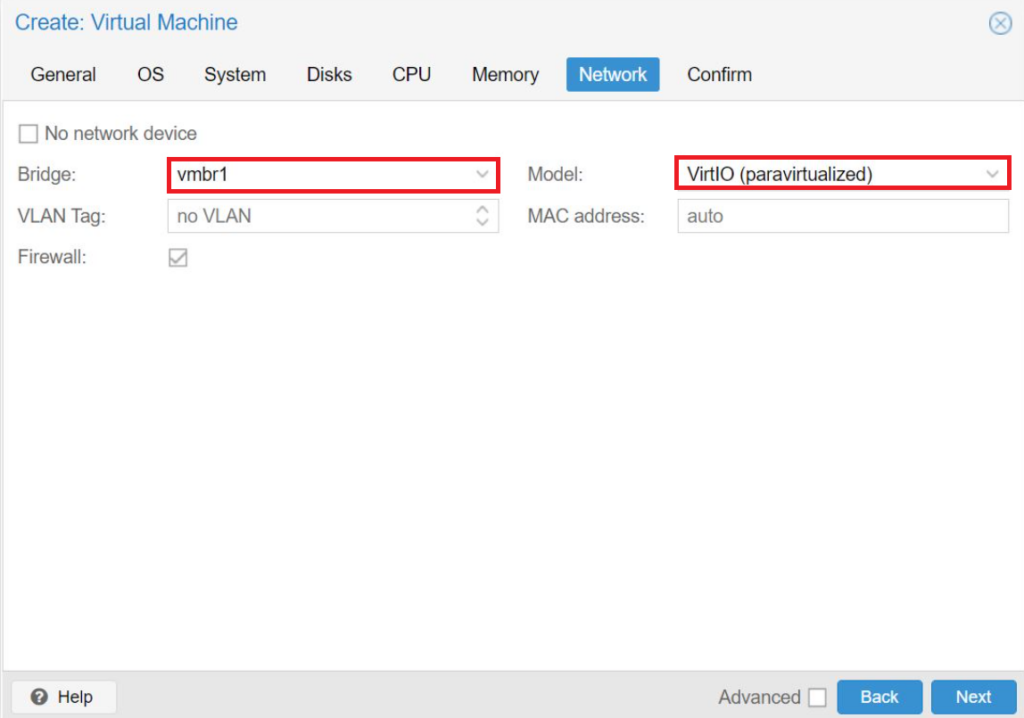
- Continue to Network tab:
- For Bridge: select ‘vmbr1’
- For Model: select ‘VirtIO (paravirtualized)’
- Continue to Confirm tab:
- Verify your settings and select 'Finish'
The VM is created, now the Linux Bridge for LAN must be added.
*Note: Additional information about VM creation can be found in [Proxmox VE Documentation].
Adding the LAN Linux Bridge to OPNsense VM
- Choose your OPNsense VM, located under your sever node dropdown.
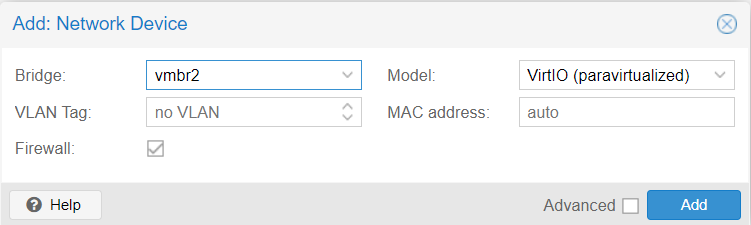
- Select OPNsense VM > Hardware > Add > Network Device
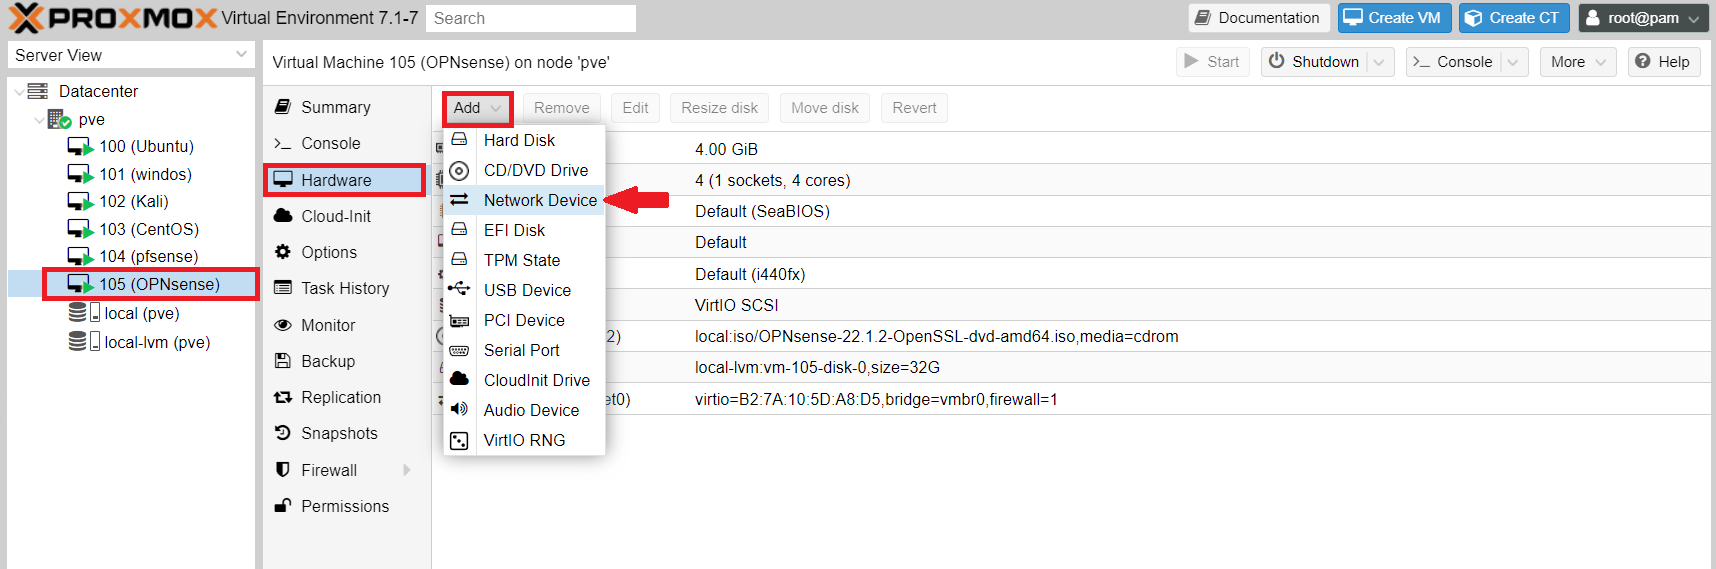
- For Bridge: Select your LAN Linux Bridge ('vmbr2' in this example)
- For Model: Select VirtIO (paravirtualized)
- Click Add
WAN and LAN are now set up and ready to use with OPNsense.
Starting, Installing, and Configuring OPNsense VM
To start the VM and begin the installation process:
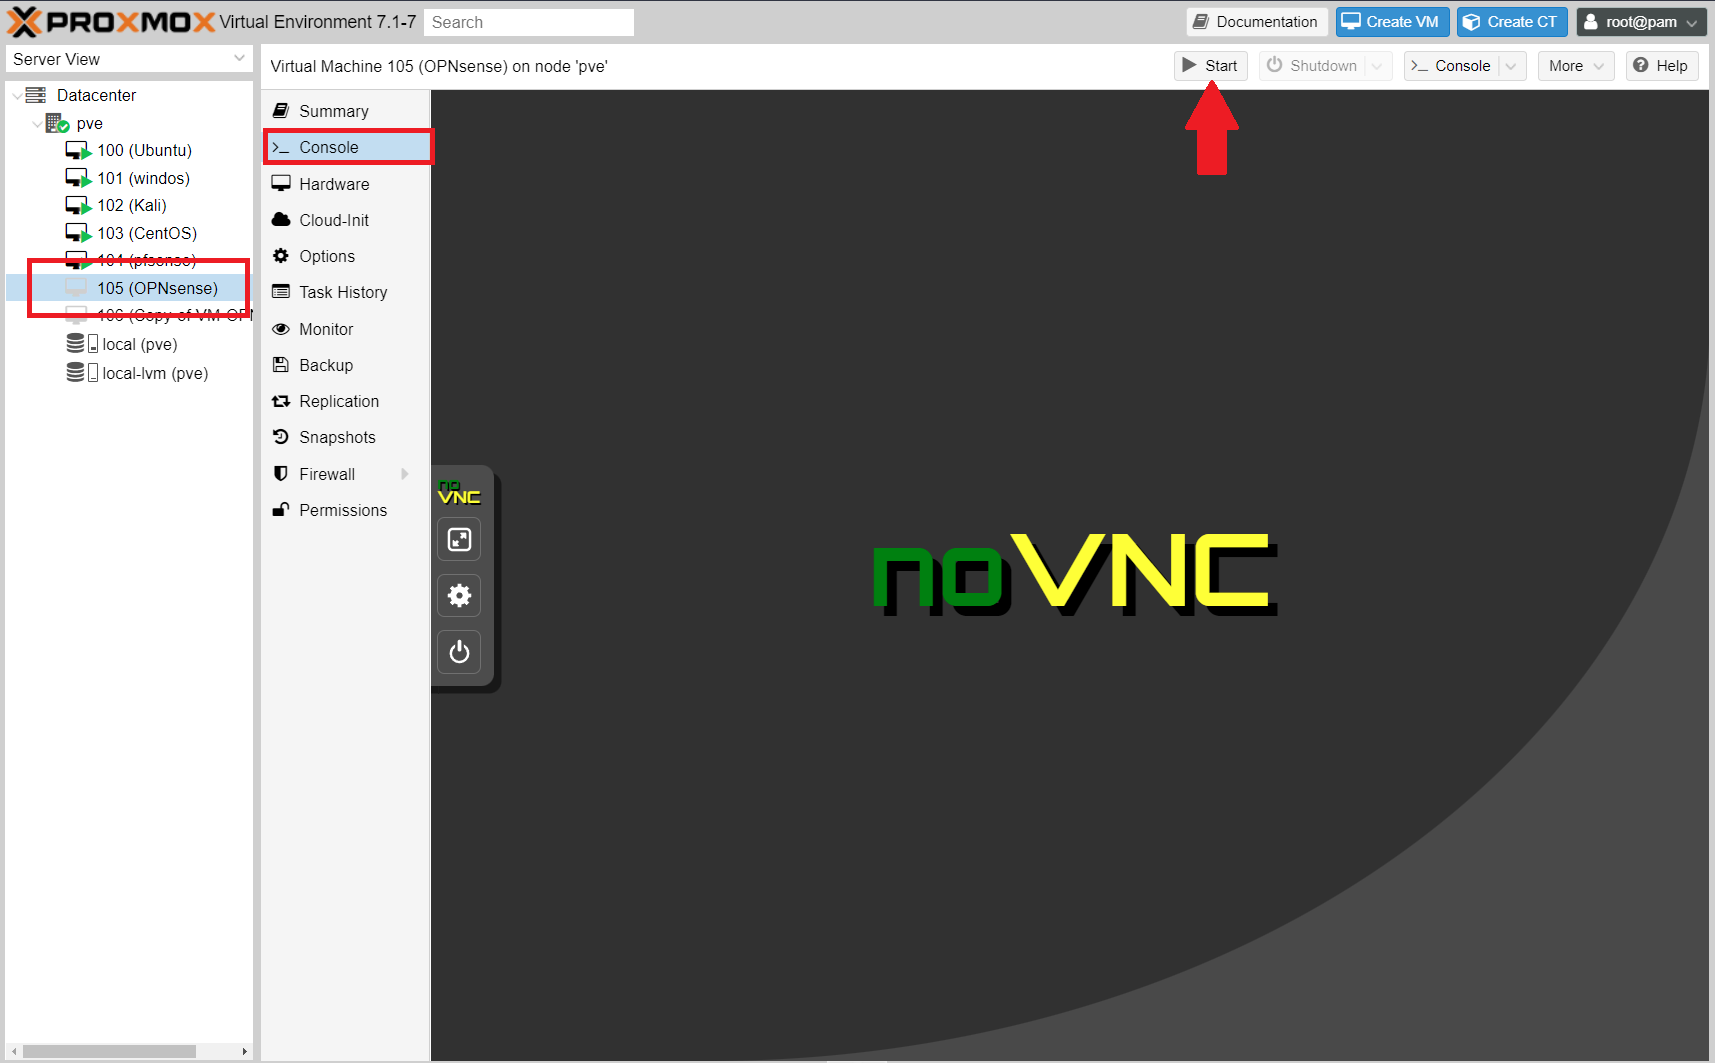
- Select the OPNsense VM from the server node dropdown
- Select Console to view the VM's display
- Select Start in the top right
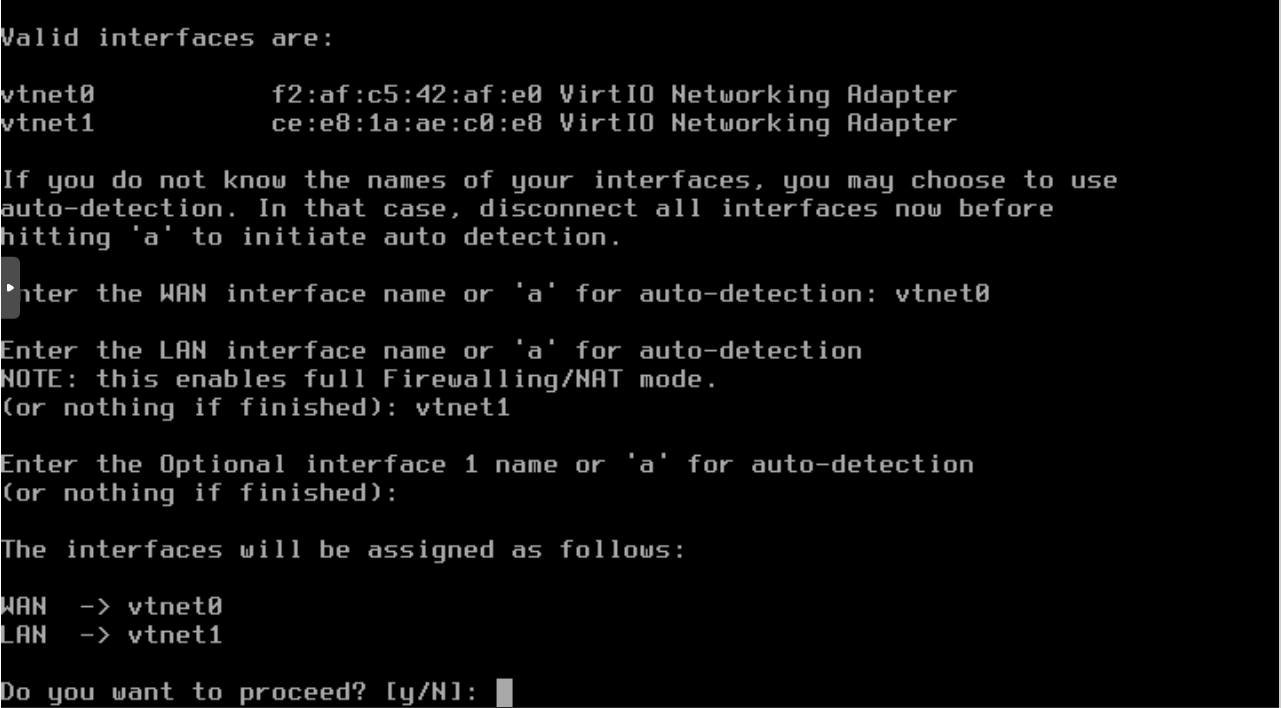
OPNsense will begin booting, during boot OPNsense will display a timed prompt "Press any key to start the manual interface assignment: "
- When asked if you want to configure LAGGs now? Input 'n'
- When asked if you want to configure VLANs now? Input 'n'
Valid interfaces will be displayed. OPNsense will name the Linux Bridges we set up earlier as vtnet0 and vtnet1, use these to configure OPNsense.
- For the WAN interface: enter vtnet0
- For the LAN interface: enter vtnet1
- Press 'Enter' once more to finish adding interfaces
- Input 'y' when ready to proceed.
- When prompted to log in, use credentials:
- login: installer
- password: opnsense
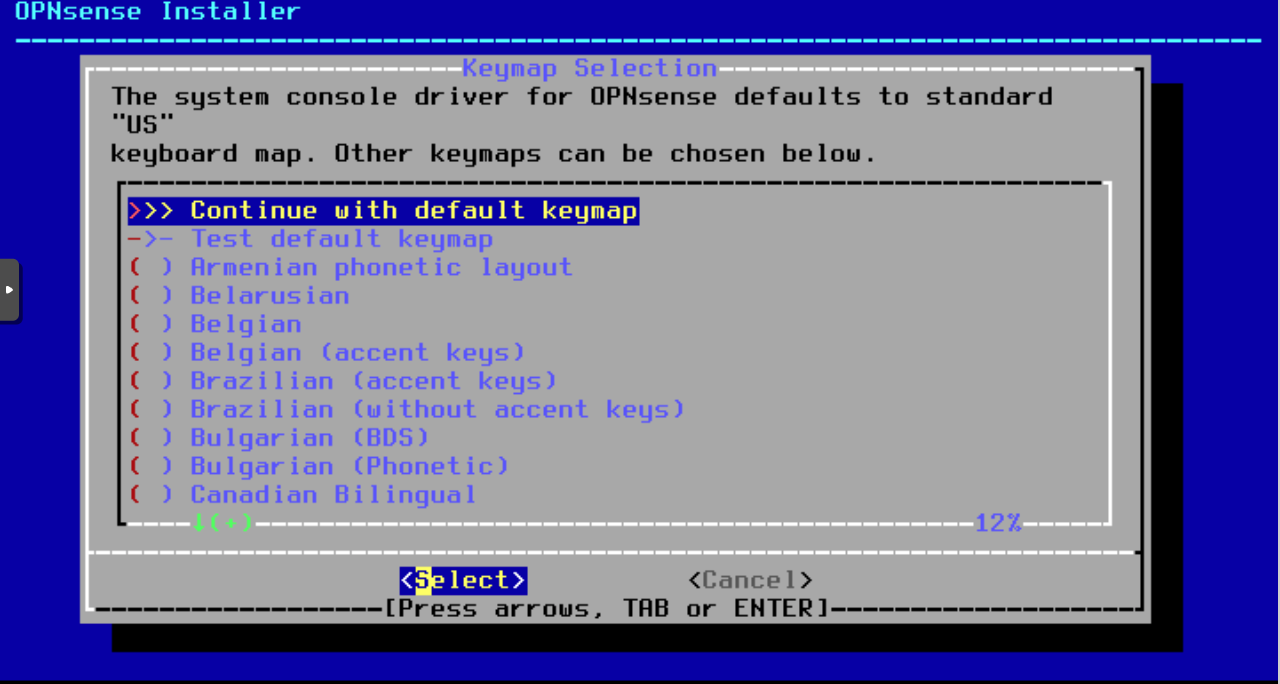
- Press Enter to Continue with default keymap
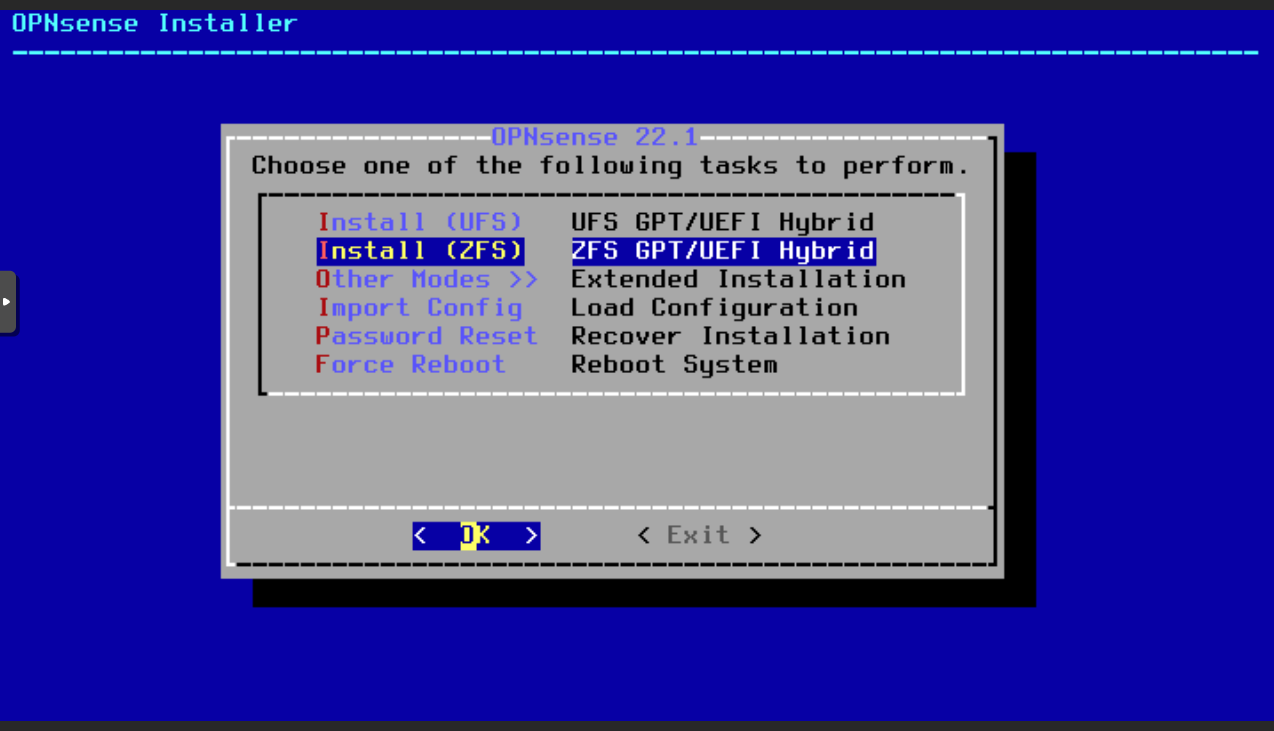
- Use the arrow keys to select ZFS install
- Press Enter to continue
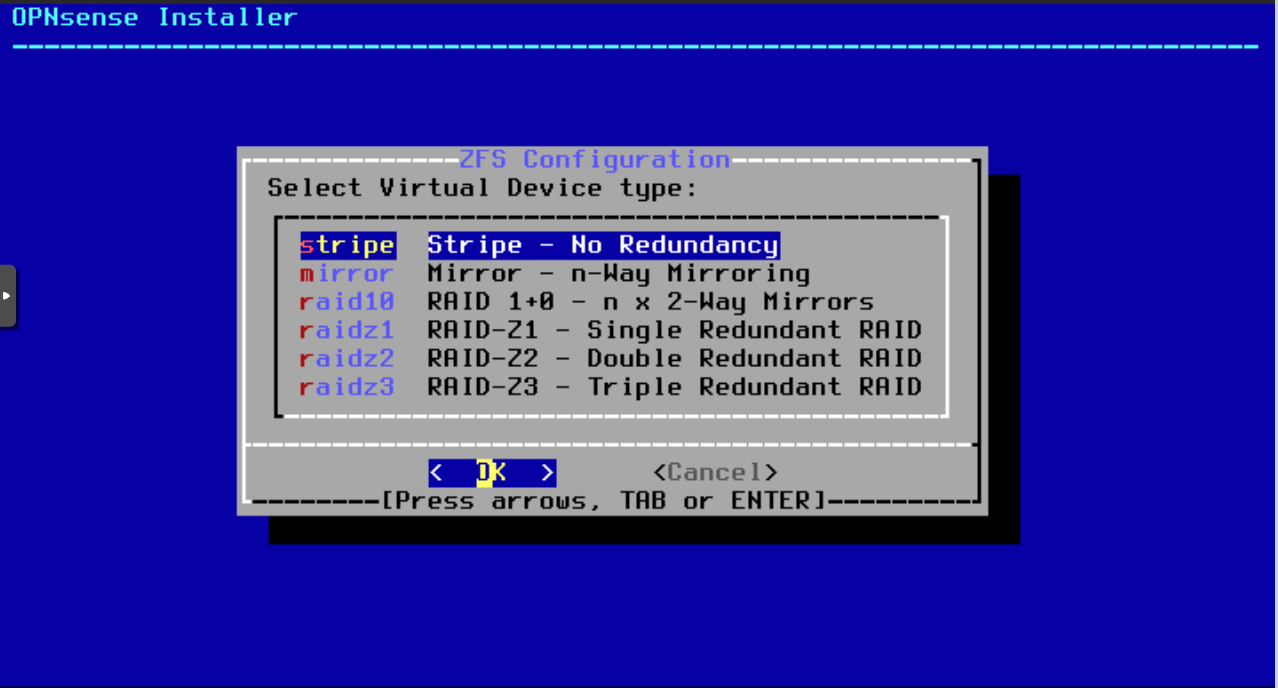
- Select 'Stripe'
- Press Enter
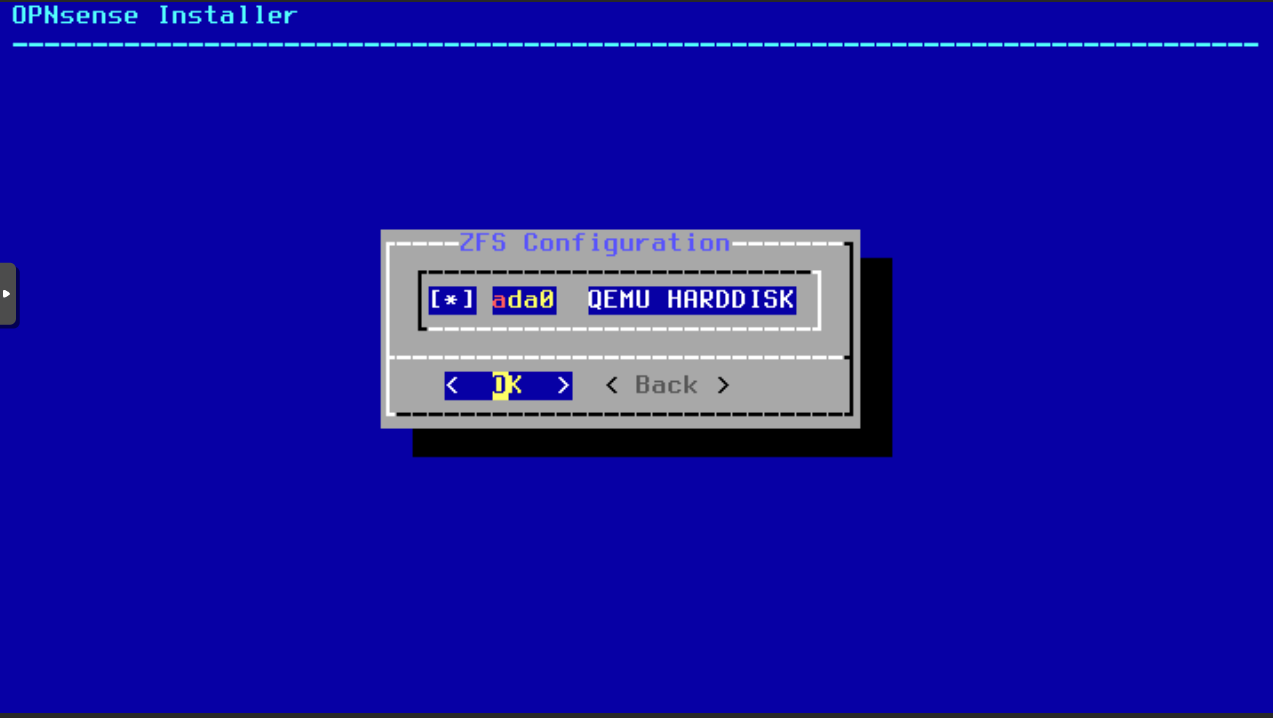
- Use the spacebar to select the drive
- Press Enter
- If the drive is not selected with the spacebar, the installation will fail.
- Select Yes to write OPNsense to the VM partition
- This will use the storage space designated when the VM was created.
- Complete Install select Exit and Reboot
Access Web GUI
192.168.1.1 is the default IP address to access the OPNsense web GUI.
Login with OPNsense default credentials:
- login: root
- password: opnsense
Congratulations! OPNsense is now operational on Proxmox VE!