Have a Question?
OpenWrt on the Vault
Overview
OpenWrt is an open source project Linux operating system (OS). Originally OpenWrt indicated "open source wireless router", but it now targets embedded devices in general as well as routers with and without WiFi. The home page can be found at https://openwrt.org/start. OpenWrt has been successfully installed on the Vault. The instructions below describe how to install OpenWrt on the Vault.
Install OpenWrt
In order to install OpenWrt, you must boot up an OS that is not on the OpenWrt target storage device and run the installation from that OS. In this example, a USB with Ubuntu is used as the OS to install OpenWrt on the Vault. You could also use an SSD and connect it to the internal SATA connector. This example uses Ubuntu 20.04 to install OpenWrt 19.07.4
*Important Note on UEFI Vaults: The VP2410 with coreboot, the VP2420 with AMI or coreboot, the FW4C with coreboot, and the VP4600 series Vaults will require a UEFI image of OpenWRT. We have successfully tested version 22.03.5's EFI image for these Vaults (https://downloads.openwrt.org/releases/22.03.5/targets/x86/64/)
Use Ubuntu to Install OpenWrt
In order to burn Ubuntu to a USB drive, see the Knowledge Base article at:
https://kb.protectli.com/kb/how-to-install-ubuntu-on-the-vault/
Go through the steps through "Burn the Installation Image to a USB Drive" but do not install Ubuntu on the unit, just run it from the USB. At the step:
- Verify the Vault boots to the Ubuntu Install page
- Select "Try Ubuntu", not "Install Ubuntu"
- Verify Ubuntu is loaded
- Open a terminal window to install OpenWrt on the Vault
- Verify the WAN port is connected to the Internet in order to download OpenWrt
Download and Install OpenWrt
- Open a browser on Ubuntu (default Firefox) and browse to:
- https://downloads.openwrt.org/releases/19.07.7/targets/x86/64/
- If using a UEFI Vault (See important note on "Install OpenWrt" section, please use this link: https://downloads.openwrt.org/releases/22.03.5/targets/x86/64/)
- Select combined-ext4.img.gz if using a legacy BIOS Vault
- Select generic-ext4-combined-efi.img.gz if using UEFI Vault
- Verify the dialog box appears
- Save the file to Ubuntu
- Move the downloaded file from "Downloads" to the desired installation directory
- Unzip the file
- #gunzip [filename]
- Verify the file is unzipped
- List the names of the drives on the unit
- #lsblk
- In Ubuntu, the main drive for installation is typically "sda"
- Verify the proper destination drive (/dev/sda in this example)
- Write the OpenWrt image to the hard drive with the "dd" command
- #sudo dd if=openwrt-19.07.4-x86-64-combined-ext4.img of=/dev/sda
- If on UEFI Vault:
- #sudo dd if=openwrt-22.03.5-x86-64-generic-ext4-combined-efi.img of=/dev/sda
- Verify the operation is successful
- Reboot to mSATA with OpenWRT
- #reboot
- Verify the unit reboots to OpenWrt and hit ENTER
- Verify the Set Password prompt appears
- Follow the on screen instructions to set the "root" password
- Verify the root password is changed
At this point, OpenWrt has been installed onto the main drive. In order to take advantage of the full size of the drive, not just the size of the image that was created with "dd", we need to reboot to Ubuntu again and resize the disk partition by using the disk tools.
Resize the Drive
- Reboot the Vault and use the F11 key to interrupt the boot process
- Select the Ubuntu USB
- Verify the Vault boots to Ubuntu and select "Try Ubuntu" again as above
- Open a terminal window
- Verify the partitions with the "lsblk" command
- # lsblk
- Identify the partition that has OpenWrt installed, typically "sda" on Ubuntu
For legacy BIOS installs, run the "fdisk" command to resize the partition
-
- # sudo fdisk /dev/sda
- Verify the fdisk prompt is displayed
- Type "p" to display the disk info
- Verify the disk info is displayed
- Write down the Start and End Sectors for sda2, they will be used below
- Delete the 2nd partition
- Type "d"
- Verify the "Partition number" field is displayed
- Type "2"
- Verify Partition 2 has been deleted
- Create a new partition
- Type "n"
- Verify the "Partition type" menu is displayed
- Type "p" for primary
- Verify the Partition number menu is displayed
- Type "2"
- Verify "First sector" prompt is displayed
- Enter the start block number for sda2 that was written down previously, for example "33792"
- Verify the "Last sector" prompt is displayed
- Select the "default" for maximum size, just hit Enter
- When prompted to remove the signature, select "No"
- Verify the "Command" prompt is displayed
- Type "w" to write the changes to the disk
- Verify the terminal returns to the Ubuntu command line
For UEFI installs, run the "parted" command to resize the partition
- #sudo parted /dev/sda resizepart 2 xxG (replace xx with the total amount of free space in GB on your SSD)
- At the prompt: "Warning: Not all the space available to /dev/sda…"
- Fix/Ignore? Type "F" for fix
- Partition number? Type "2"
- End? Hit "enter"
Run the "resize2fs" command to resize the file system
- Now we need to resize the filesystem to take advantage of the larger partition size
- Resize sda2 using the "resize2fs" command
- # sudo resize2fs /dev/sda2
- If prompted to run "e2fsck", run the command
- # sudo e2fsck -f /dev/sda2
- Follow the prompts and verify the filesystem was modified
- Run resize again
- # sudo resize2fs /dev/sda2
- Verify the filesystem is resized
- Power off the unit and remove the Ubuntu USB drive
- Power on the unit and verify it boots to OpenWrt
- Type "Enter"
- Verify the OpenWrt command line is displayed
Change Default Settings
At this point, OpenWrt is installed on the Vault with the default settings as follows:
- The LAN port is configured on "eth0" and the WAN port is configured on "eth1".
- The LAN port is configured as a bridge "br-lan" with IP Address 192.168.1.1.
- The WAN port is configured to receive an IP address via DHCP
For legacy BIOS installs:
In order to set eth0 to WAN and eth1 to LAN, do the following:
- Edit /etc/config/network
- Under "configure interface ‘lan’", set "option ifname" to "'eth1'"
- Under "configure interface ‘wan’", set "option ifname" to "'eth0'"
- Save file
In order to remove the bridge and enable the LAN port on eth1 as a DHCP server, do the following:
- Edit /etc/config/network
- Under "configure interface ‘lan’", remove the line "option type ‘bridge’"
- Save File
- Edit /etc/config/dhcp
- Under "config dhcp ‘lan’", change "option dhcpv6 ‘server’" to "option dhcpv4 ‘server’"
- Save File
For UEFI intalls:
In order to set eth0 to WAN and eth1 to LAN, do the following:
- Change the directory to where the config file is stored: type "cd /etc/config/"
- Open the network configuration file in the VIM text editor: type "vim network"
- Hit "insert" to begin editing then replace all "eth0" with "eth1" and all "eth1" with "eth0"
- If you make a mistake you can't correct hit "escape" then ":q" to quit without saving
- If everything is correct, hit "escape" then type ":wq" to write to the file and quit the text editor
- Type "reboot" to reboot your Vault
To initiate the changes, run the command:
- # /etc/init.d/network restart
- Verify the network restarts
- Verify a PC connected to the LAN port of the Vault gets an IP address from OpenWrt in the address range of 192.168.1.xxx
At this point, OpenWrt has been installed on the Vault, the WAN and LAN ports have been assigned to "eth0" and "eth1" respectively and the LAN port is a DHCP server.
Web GUI (LuCI)
The OpenWrt project has a web based GUI called "LuCI" to manage the devices. The LuCI documentation can be found at:
https://openwrt.org/docs/guide-user/luci/start
In order to install LuCI on the device, run the following commands from the command line:
-
- # opkg update
- # opkg install luci-ssl
Connect an Ethernet cable between the LAN port of the Vault and a PC.
- Verify the PC receives an IP address via DHCP from OpenWrt.
- Browse to 192.168.1.1 and verify the LuCI login is displayed.
- Login using the root password that you set during the installation process.
- Verify the LuCI dashboard is displayed.
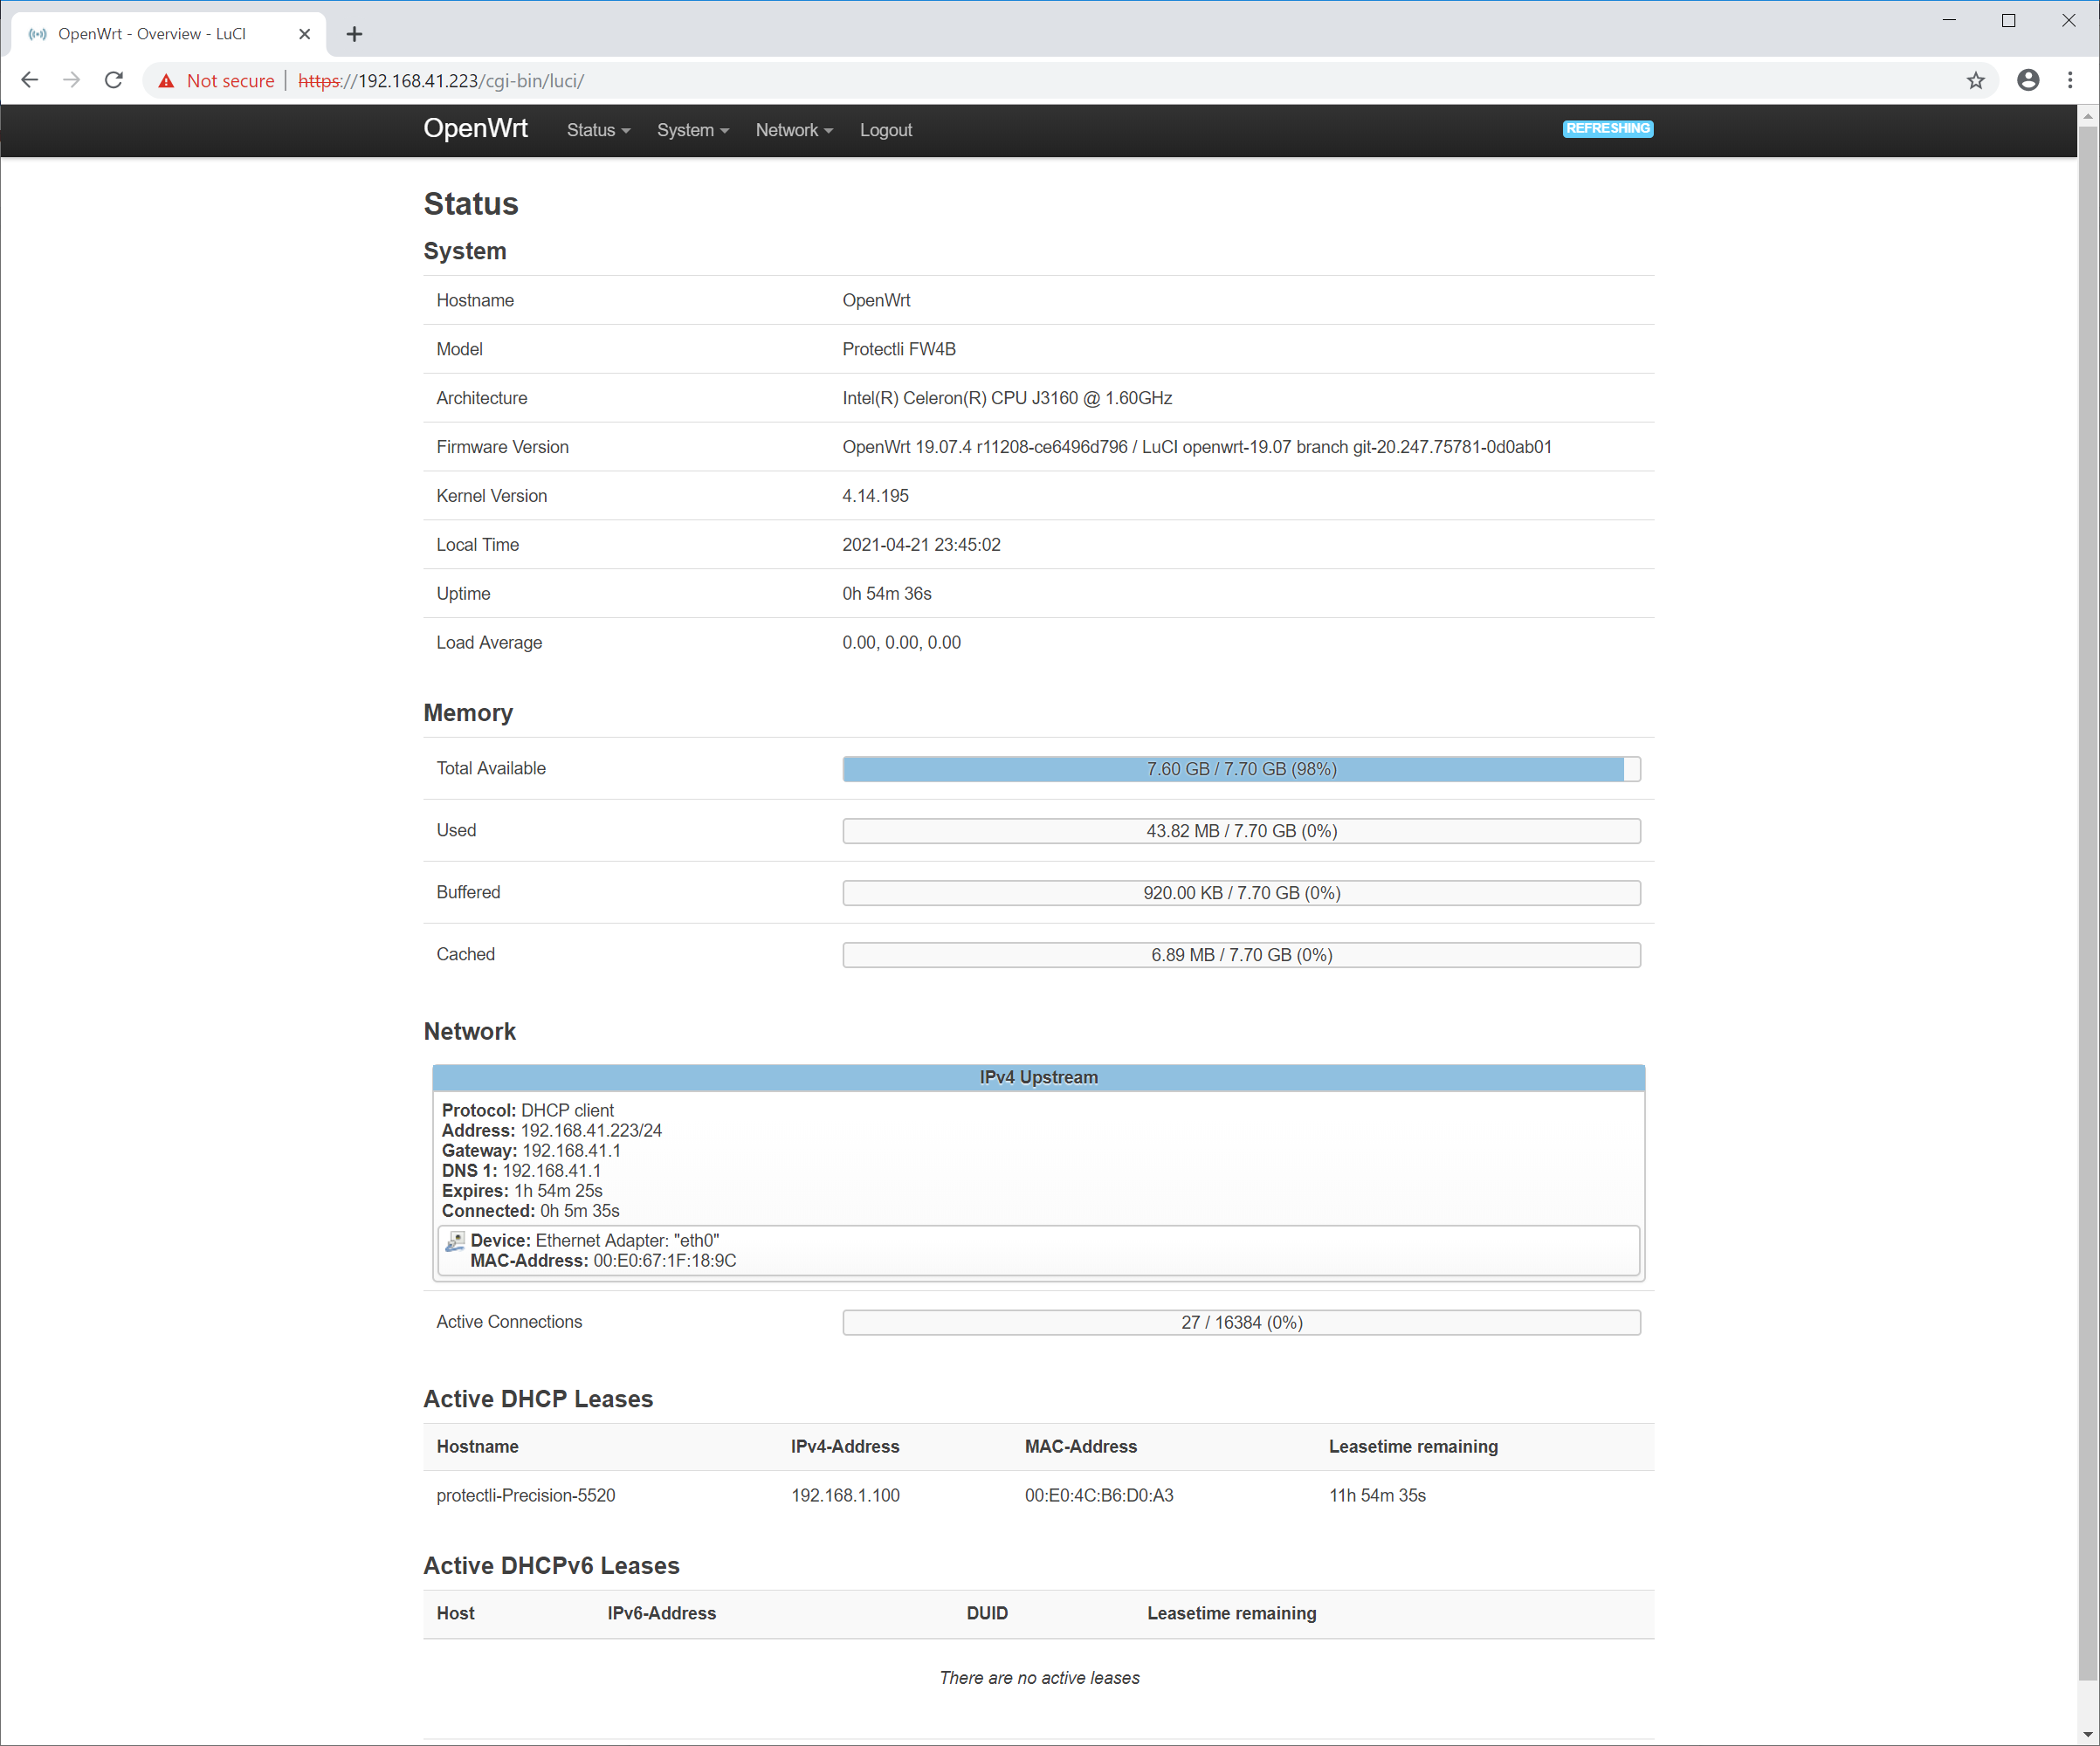
At this point OpenWrt has been installed on the unit and the LuCI Graphical Web Interface is available to configure and manage the device.
If you experience any issues, feel free to contact Protectli support at: support@protectli.com
Adding LTE modem support
If your Vault is equipped with one of our internal MDG100 or MDG200 modems, you can utilize this as an interface on OpenWRT.
- Access the OpenWRT web GUI at 192.168.1.1
- Login
- You must install needed packages, so navigate to System > Software
- Click "Update lists…" (Make sure the Vault has a WAN connection)
- Search for "kmod-usb-net-rndis", make sure you have the "Available" tab selected
- You may need to search for "rndis" to see it
- Install
- Reboot the Vault (YOU MUST REBOOT)
- Go back into the OpenWRT web GUI
You now need to add the LTE interface.
- Go to Network > Interfaces
- Add new interface…
- Enter a name for the interface
- Select DHCP client for Protocol
- Select Ethernet Adapter: "usb0"
- Create interface
- For a WAN connection, change the firewall-zone to WAN
- Save
- Save and Apply settings
You should now be able to access the modem's web GUI at 172.16.0.1 and also utilize the modem for an internet connection.