Have a Question?
How to Install IPFire on the Vault
Overview
IPFire is an open source firewall and network security platform. The home page is at https://www.ipfire.org. To install an instance of IPFire, there is a relatively straight forward process that is very similar to installing any operating system onto any computer.
Verify Hardware Recommendations
IPFire has good documentation regarding the hardware recommendations on their website. Be sure to review the requirements located at https://wiki.ipfire.org/hardware/requirements to verify the proper memory and storage is available for the intended application.
Install IPFire
Obtain the Installation Image and Uncompress it
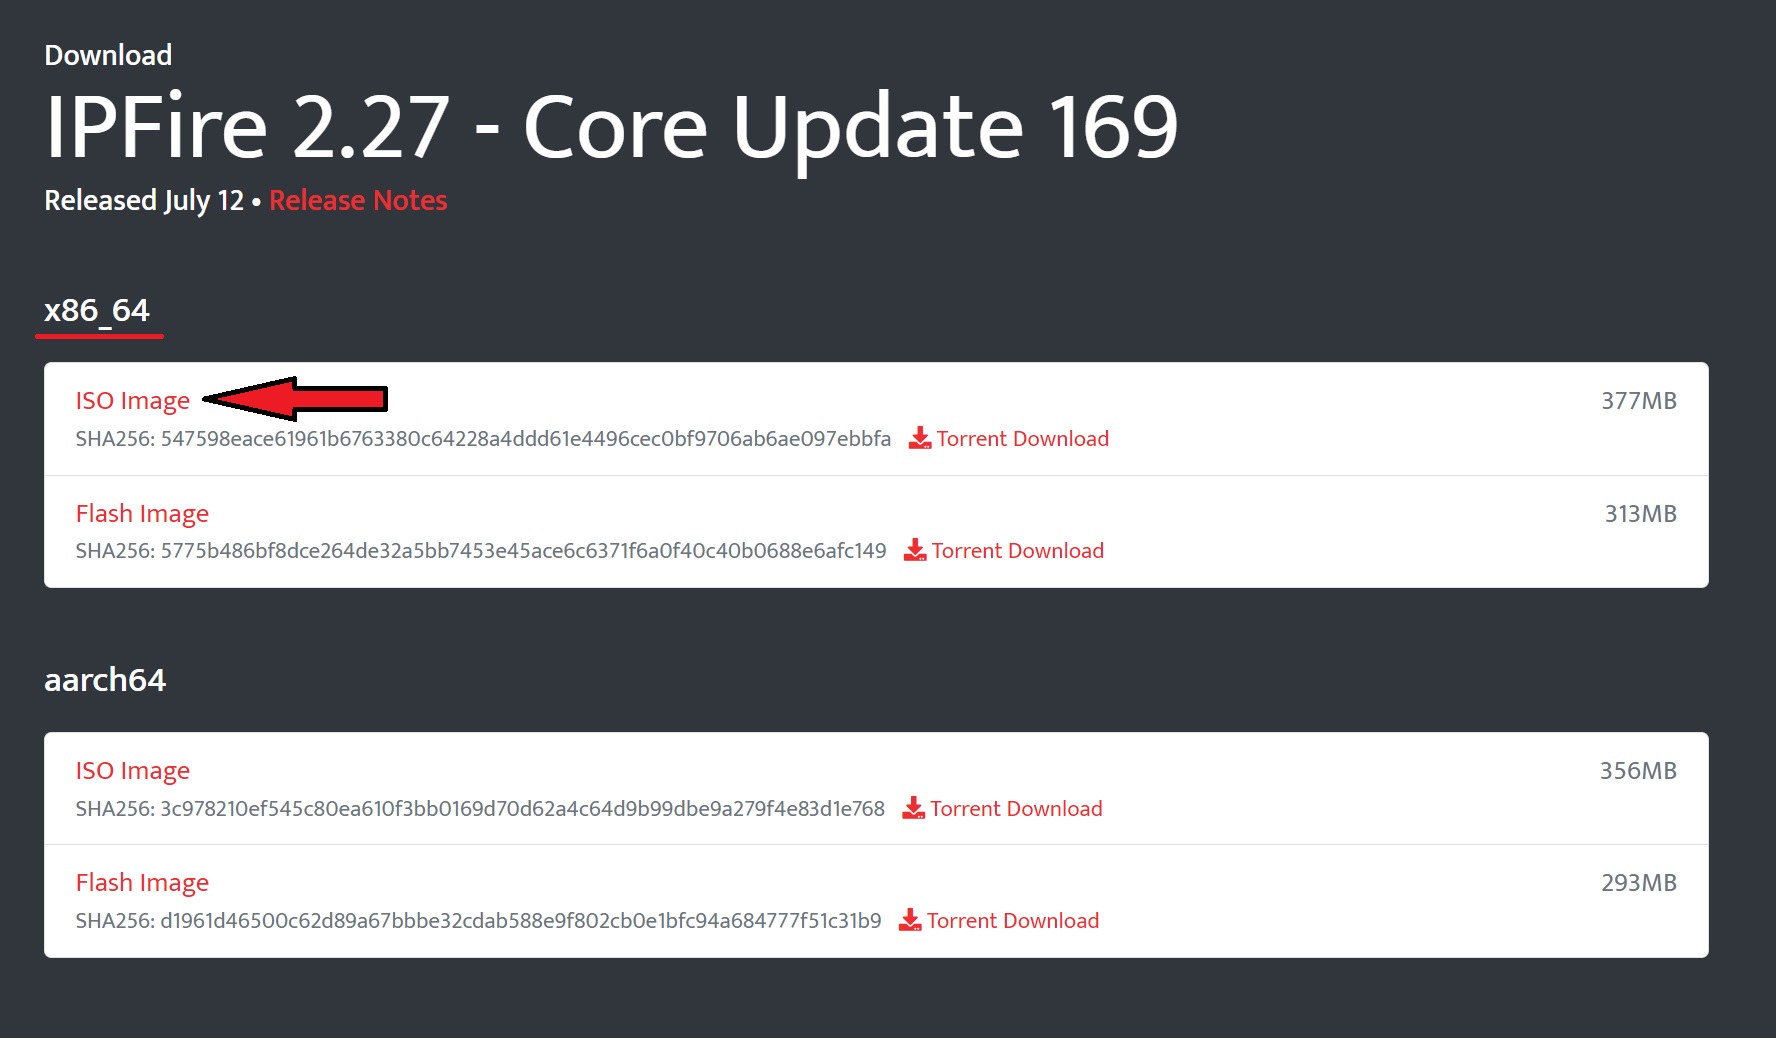
The IPFire installation image can be downloaded from https://www.ipfire.org/download/. The same image can be used to install it on any of the Vault platforms. Select the x86_64 ISO image for use with all Vault models.
Burn the installation image to a USB drive
The easiest way to transfer the installation image to a USB drive is by using software called "Rufus" on Windows or "balenaEtcher" on Apple OSX. See this link for detailed instructions on how to create a bootable USB drive using Rufus.
Note: When burning with Rufus you will be prompted to choose "ISO mode" or "DD mode" when burning the image, select "DD mode".
Note: If using the Vault FW1x, FW2x, or FW4x, be sure to use a USB stick and the USB keyboard with a plug that is relatively skinny. The 2 USB ports on the Vault are very close to each other and if either the USB stick or the USB keyboard plug is too wide, you will not be able to plug both in at the same time, which will prevent you from doing the installation.
Install the Operating System on the Vault
Once the IPFire installation image is properly copied to the USB drive, it is ready to be installed on the Vault. There is a good installation guide for IPFire at https://wiki.ipfire.org/installation/start. Once the USB is ready, one can go straight to the Initial Setup page at https://wiki.ipfire.org/installation/step4 and follow the instructions from that point.
- Verify the Vault is powered down
- Verify the monitor is connected
- Verify the USB keyboard is plugged in
- Insert the USB stick into the Vault
- Press 'F11' and choose the USB drive to verify the system boots from the install media
- Verify the "Install IPFire" page appears on the VGA monitor
- Select Install
- Select the language
- Start the installation
- Accept the license
- Select "XFS" for the filesystem type
- Verify IPFire is successfully installed
- Note the instructions to remove the installation media, reboot, and point the browser to https://ipfire:444 for web configuration
- Verify the system reboots
- Select keyboard type
- Select Timezone
- Enter Hostname
- Enter Local Domain Name
- Enter root password (used for command line access)
- The text will be hidden as you are typing
- Enter admin password (used for browser access)
- The text will be hidden as you are typing
Now the system is ready for "Network Installation". See the IPFire installation guide for details at https://wiki.ipfire.org/installation/step5. In this example we will install a "Green + Red" network where "Red" corresponds to the external network connected to the "WAN" interface on the vault and "Green" corresponds to the first internal network connected to the "LAN" interface on the vault.
- You should now be on the "Network configuration menu"
- Select "Green + Red" network in the "Network Configuration Type" settings
- In "Drivers and Card Assignments" set "Red" to the first NIC card shown in the list. It will be the "WAN" interface
Once the Red is set to the first NIC, that card will not be shown again when selecting the NIC for Green
- In "Drivers and Card Assignments" set "Green" to the first NIC shown in the list which will be the "LAN" interface
- Hit "Done" to go back to the "Network configuration menu"
Follow the next set of instructions to set the Red (WAN interface) to DHCP and the Green (LAN interface) to the static IP address of 192.168.1.1 as a DHCP server.
- In "Address Settings" Select the Red interface and choose the DHCP option
- Because we are using DHCP: the IP address and Gateway settings can be skipped
- The Network mask might be auto-filled as 255.255.255.0
- In "Address Settings" Select the Green interface and configure it with the IP address of 192.168.1.1 with a Network mask of 255.255.255.0
- Hit "Done" to finalize the changes to the "Address Settings"
- Hit "Done" again to continue to DHCP server configuration
- Set DHCP server to "Enabled" by pressing your spacebar while highlighted over it
- Set the "Start address" as 192.168.1.100
- Set the "End address" as 192.168.1.200
- Set the DNS server IP address
- This can be set to 192.168.1.1 if nothing has been auto-filled
- Hit "Ok"
- Follow the on screen instructions and verify the system reboots.
- Connect a PC via the LAN port on the Vault
- Verify the NIC LEDs are lit
- Browse to https://192.168.1.1:444 to login to the IPFire Dashboard
- Verify the login prompt occurs
- Login as user "admin" with password that was set during the installation process
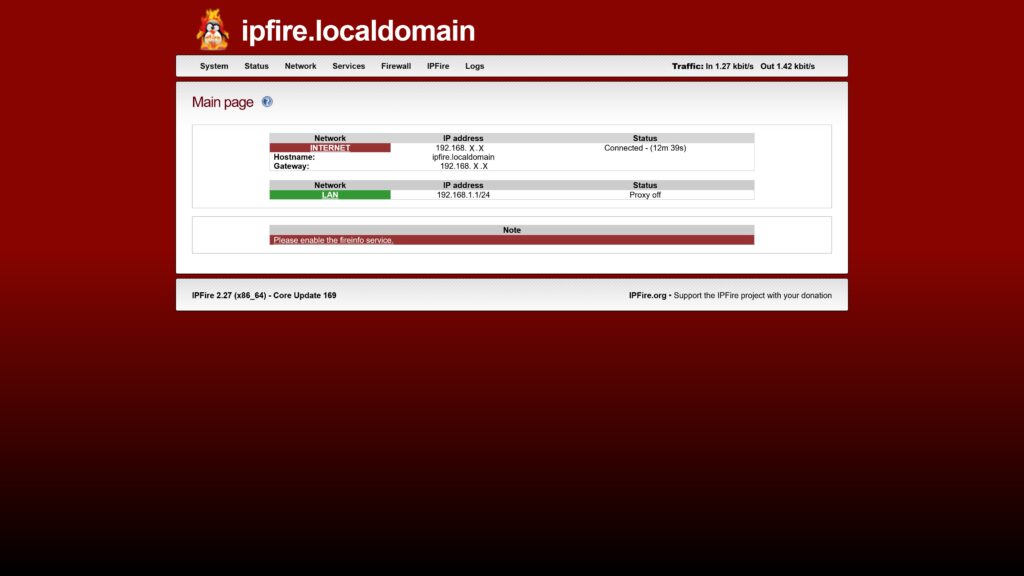
- Verify the IPFire dashboard is displayed on the browser
At this point IPFire is installed and can be further configured via the Web User Interface. A screenshot of the IPFire opening page is shown below.
If you experience any issues, please feel free to reach out at support@protectli.com or find more information in our Knowledge Base.
| Vault | IPFire Version | AMI BIOS - Legacy | AMI BIOS - UEFI | coreboot |
|---|---|---|---|---|
| FW2B | IPFire 2.27 | Tested | Tested | Tested |
| FW4B | IPFire 2.27 | Tested | Tested | Tested |
| FW6A | IPFire 2.27 | Tested | Tested | Tested |
| FW6B | IPFire 2.27 | Tested | Tested | Tested |
| FW6C | IPFire 2.27 | Tested | Tested | Tested |
| FW6D | IPFire 2.27 | Tested | Tested | Tested |
| FW6E | IPFire 2.27 | Tested | Tested | Tested |
| VP2410 | IPFire 2.27 | AMI Only | Tested | Tested |
| VP4630 | IPFire 2.27 | Failed, Use UEFI | Tested | Not Tested (TBD) |