Have a Question?
How to Add I225 Support for ESXi7
Overview
All of our vaults support ESXi, but certain versions of ESXi may not include the device driver(s) to support our hardware. For example, the Protectli VP4630 uses Intel I225-V Ethernet Controllers (NICs). Although the I225 is not within the ESXi driver library, it can be added. This article will show how to install and configure the I225-V driver for ESXi 7.0.
To learn how to add I225 support for ESXi7, continue reading.
Error Message
The image below illustrates the error message we received during our initial installation of ESXi7.
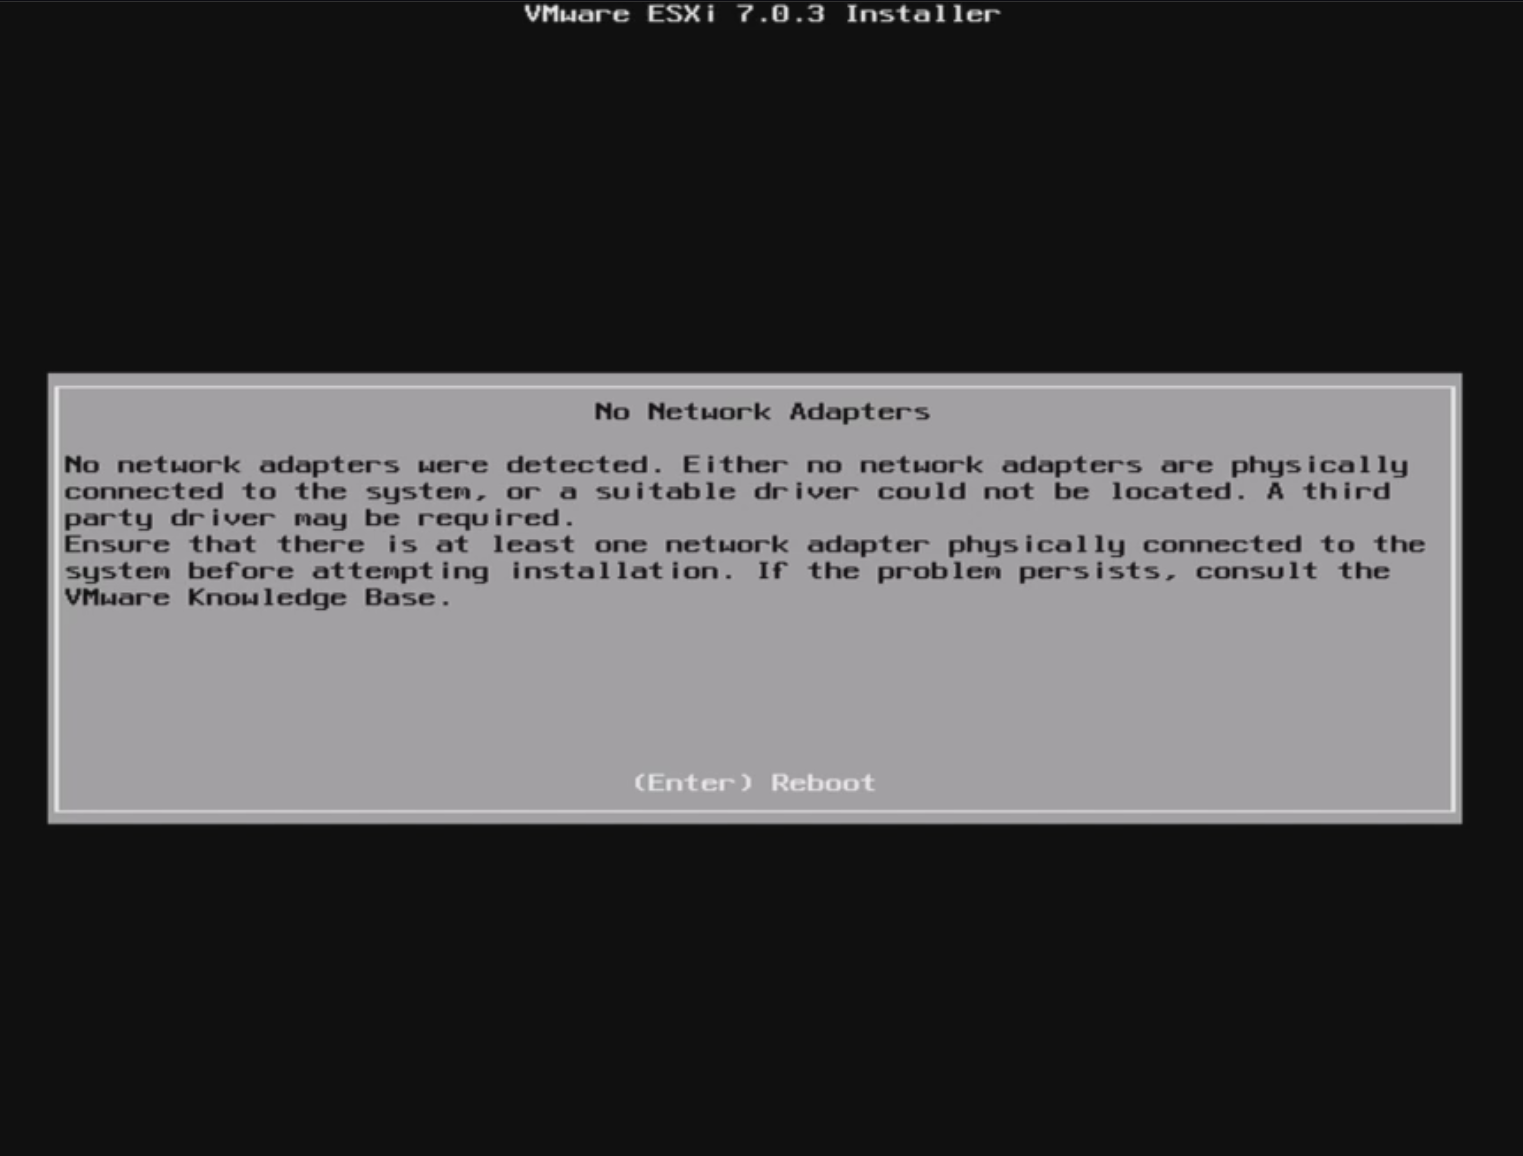
Ex. Common Installation Error Image
Prerequisites
If an error message for "No Network Adapters" is displayed, one needs to build a new ISO that includes the correct driver for the NICs. To build a new ISO with the correct driver, one must download some programs or tools locally. This example uses a Windows PC to create the ISO.
PowerCLI
- The PowerCLI Installation Guide for your preferred operating system can be found here.
- Verify the PowerCLI Installation Guide page is displayed, as shown below.
- Under the Get Started section, select your desired OS and follow the installation instructions.
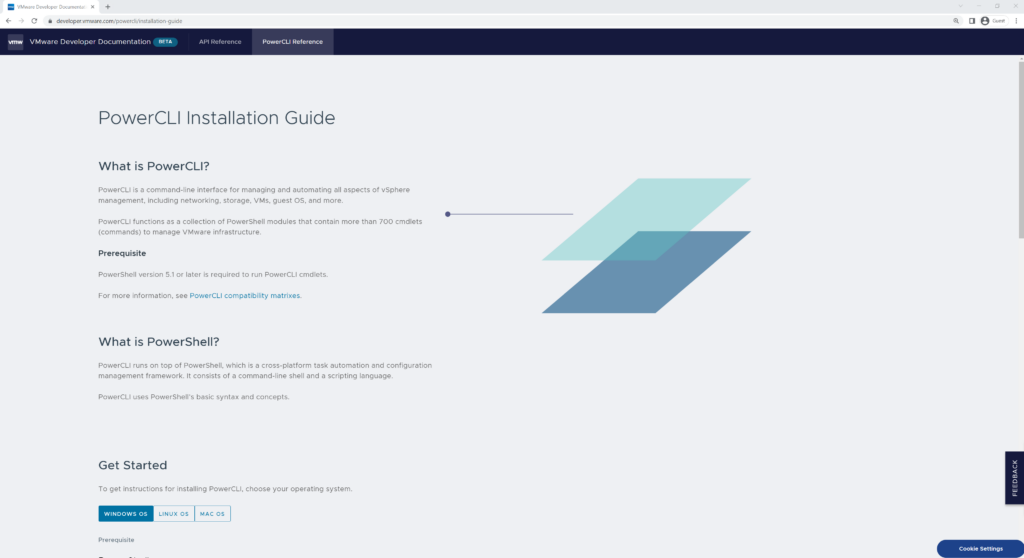
Website: PowerCLI Installation Guide
VMware vSphere Hypervisor (ESXi) Offline Bundle
- To gain access, you will need to register with VMware Customer Connect. ESXi can be downloaded for free here https://customerconnect.vmware.com/en/web/vmware/evalcenter?p=vsphere-eval-7.
- Select the License & Download, if not already selected.
- Verify the Download Packages are shown.
- Select the plus symbol to expand the Download the hypervisor (vSphere ESXi Installable) menu
- Verify two packages are shown;
- VMware vSphere Hypervisor (ESXi ISO) image
- VMware vSphere Hypervisor (ESXi) Offline Bundle
- Select Manual Download for VMware vSphere Hypervisor (ESXi) Offline Bundle.
- Save the Offline Bundle to your Desktop.
Note: The image below is a visual reference of the required file.
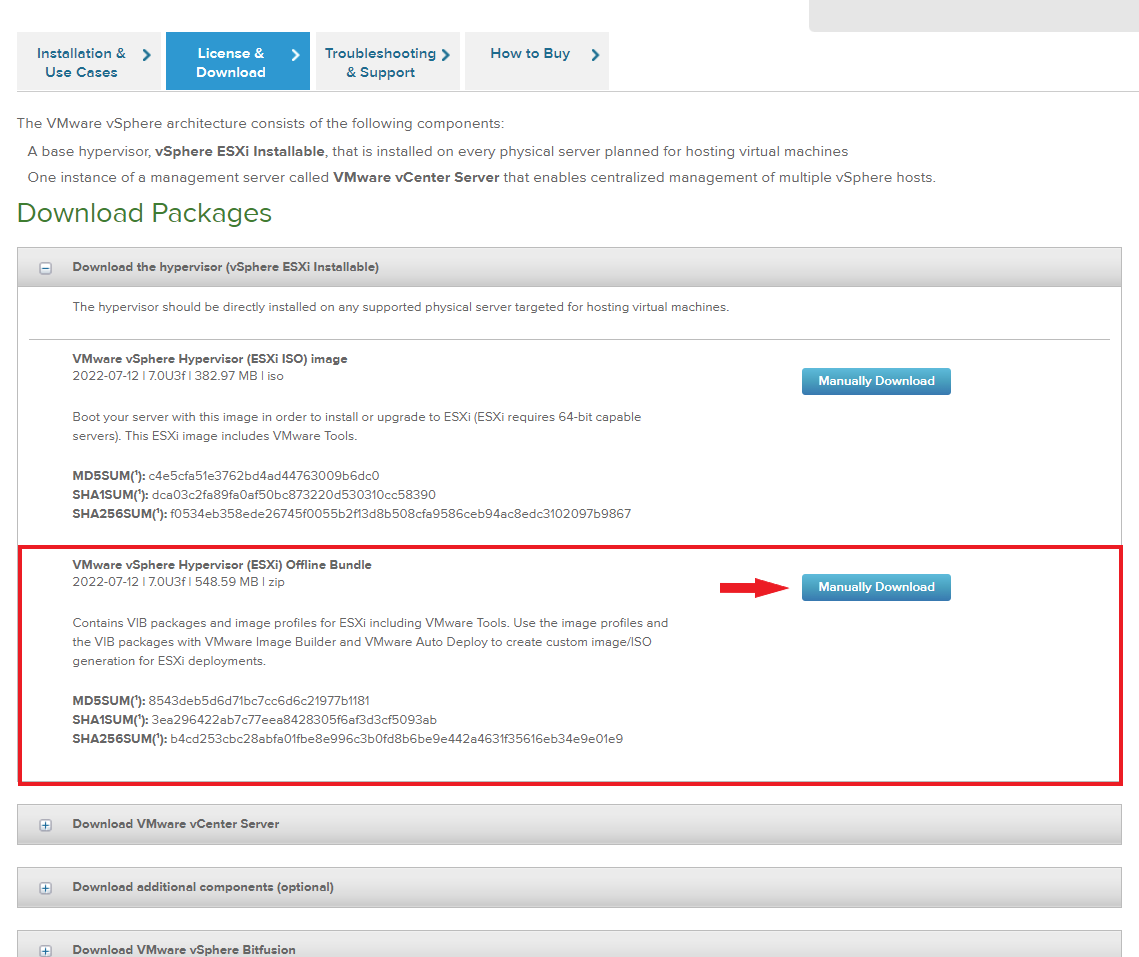
Website: VMware Customer Connect Product Download for ESXi7
Community Networking Driver for ESXi (version 1.2.7 -March 15, 2022)
- Check VMware Flings community list for your PCIe-based network adapter; click here.
- Verify the Fling page is similar to the image below.
- Select Requirements on the left, under Project Details
- Verify the NIC is in one of the packages (in-community or e1000-community)
- Agree to the Technical Preview License at the top of the page
- Select Download to obtain the driver zip file.
- Save the community package to your desktop.
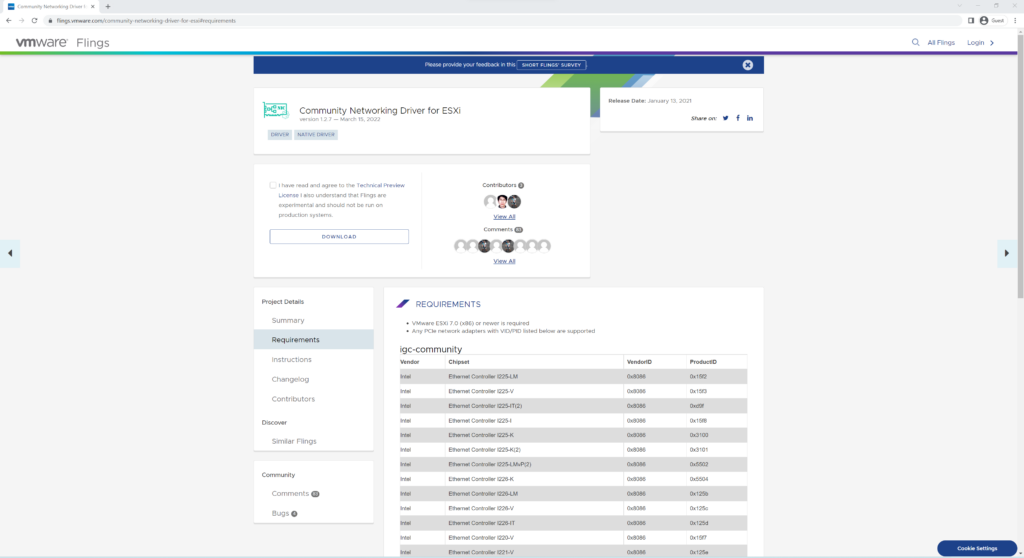
Website: VMware Flings Community Networking Driver for ESXi.
Setup
After all the prerequisites are completed, we can begin to add I225 support for ESXi. Again, these steps were conducted on Windows 10.
- Create a new folder in the location of your choice; we used the desktop.
- Drag and drop the two downloaded files to the new folder; currently names below:
- Net-Community-Driver_1.2.7.0-1vmw.700.10.0.15843807_19480755.zip
- VMware-ESXi-7.0U3d-19482537-depot.zip
- Unzip the Net-Community-Driver_1.2.7.0-1vmw.700.10.0.15843807_19480755.zip file to the same folder.
- Verify all three files are shown like the image below.
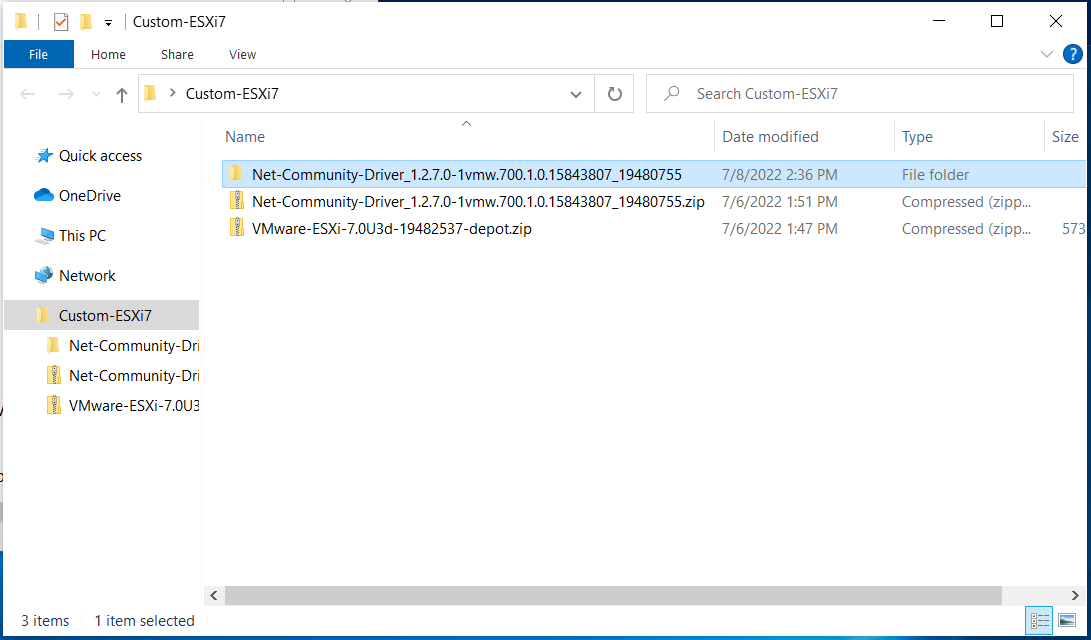
Ex. Consolidated Folder
- Using Windows 10 search feature, type PowerShell.
- Verify PowerShell is displayed.
- Select Run as Administrator
- Then select "Yes."
- Navigate to the newly created folder within PowerShell.
- Verify you are in the new folder before proceeding.
- The execution policy must be set at the beginning of every image creation attempt.
- Set-ExecutionPolicy -ExecutionPolicy RemoteSigned -Scope LocalMachine
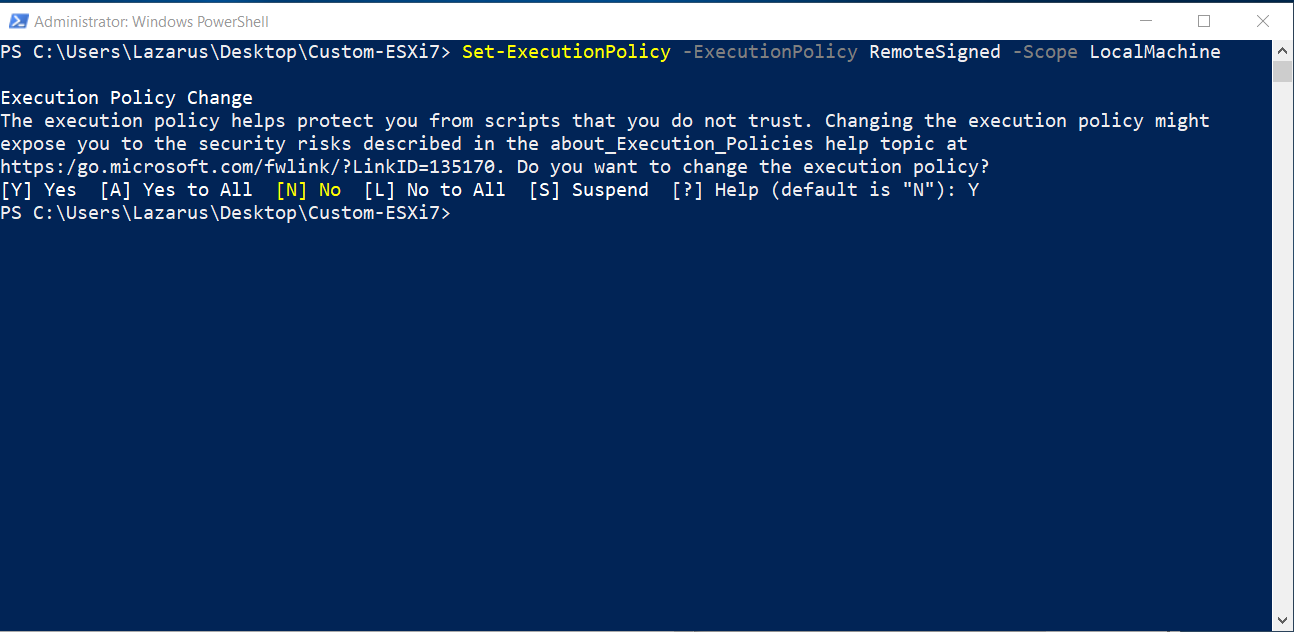
Ex. Set-ExecutionPolicy
- Stage the ESXi and the unzipped Community depot with the following commands.
- Add-EsxSoftwareDepot .\VMware-ESXi-7.0U3d-19482537-depot.zip
- Add-EsxSoftwareDepot .\Net-Community-Driver_1.2.7.0-1vmw.700.1.0.15843807_19480755
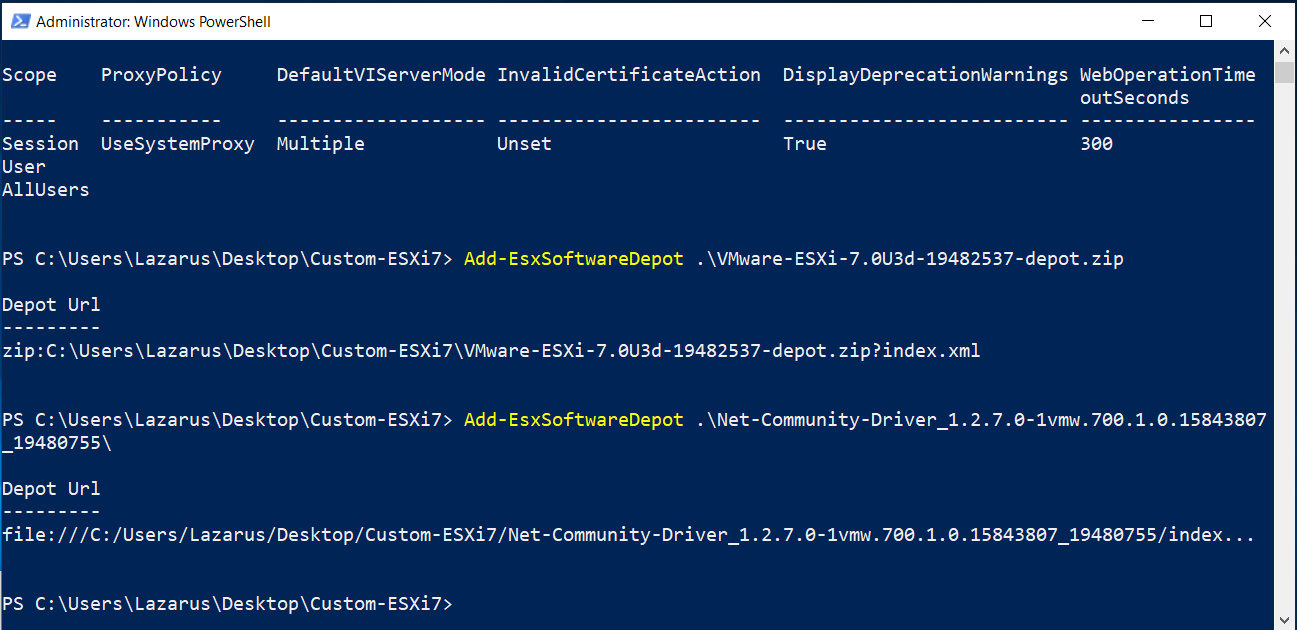
Ex. Add-EsxSoftwareDepot
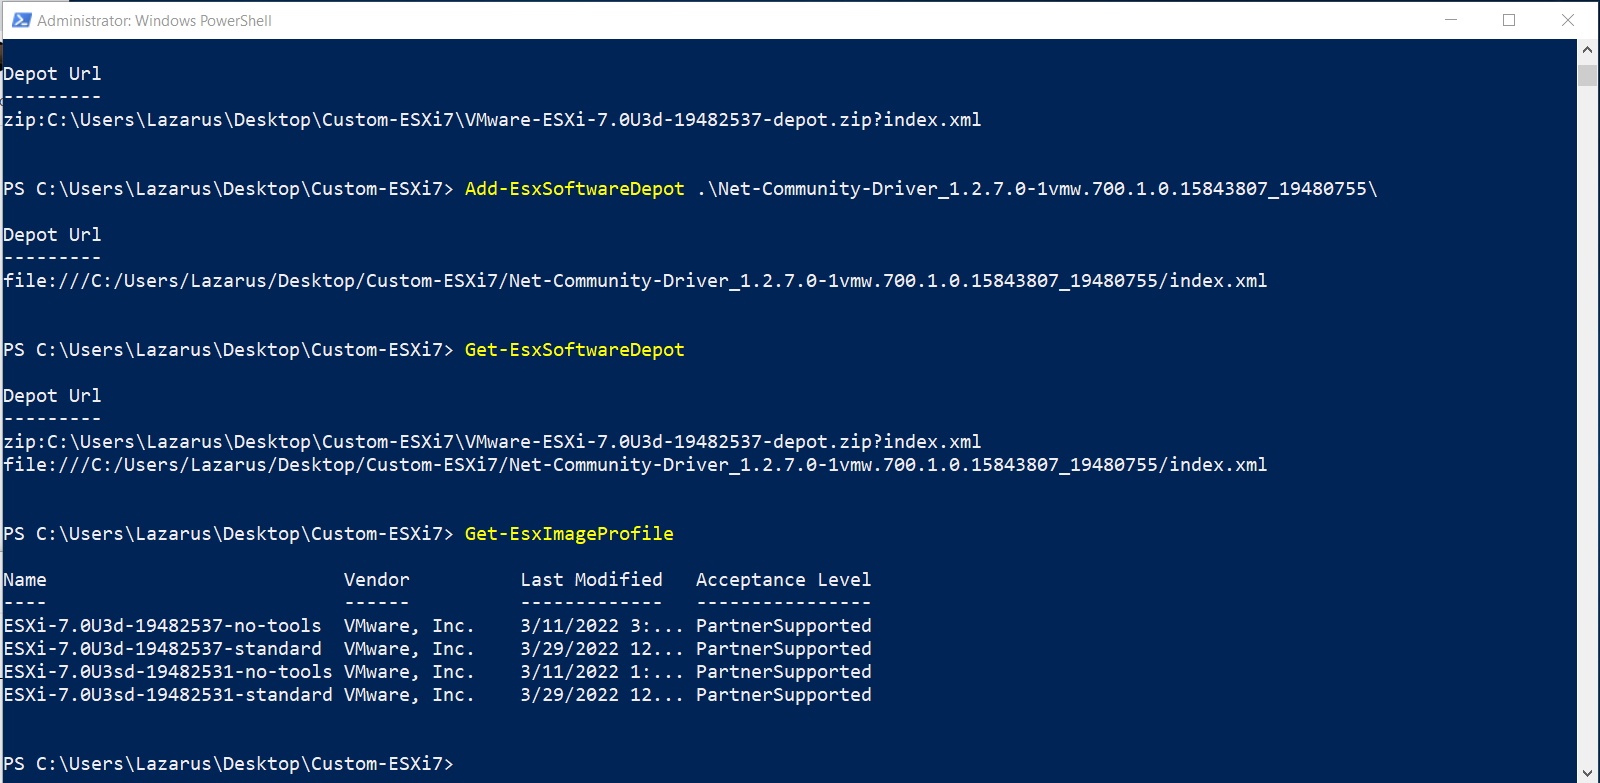
- Ensure two entries are in the Depot Url by running;
- Get-EsxSoftwareDepot
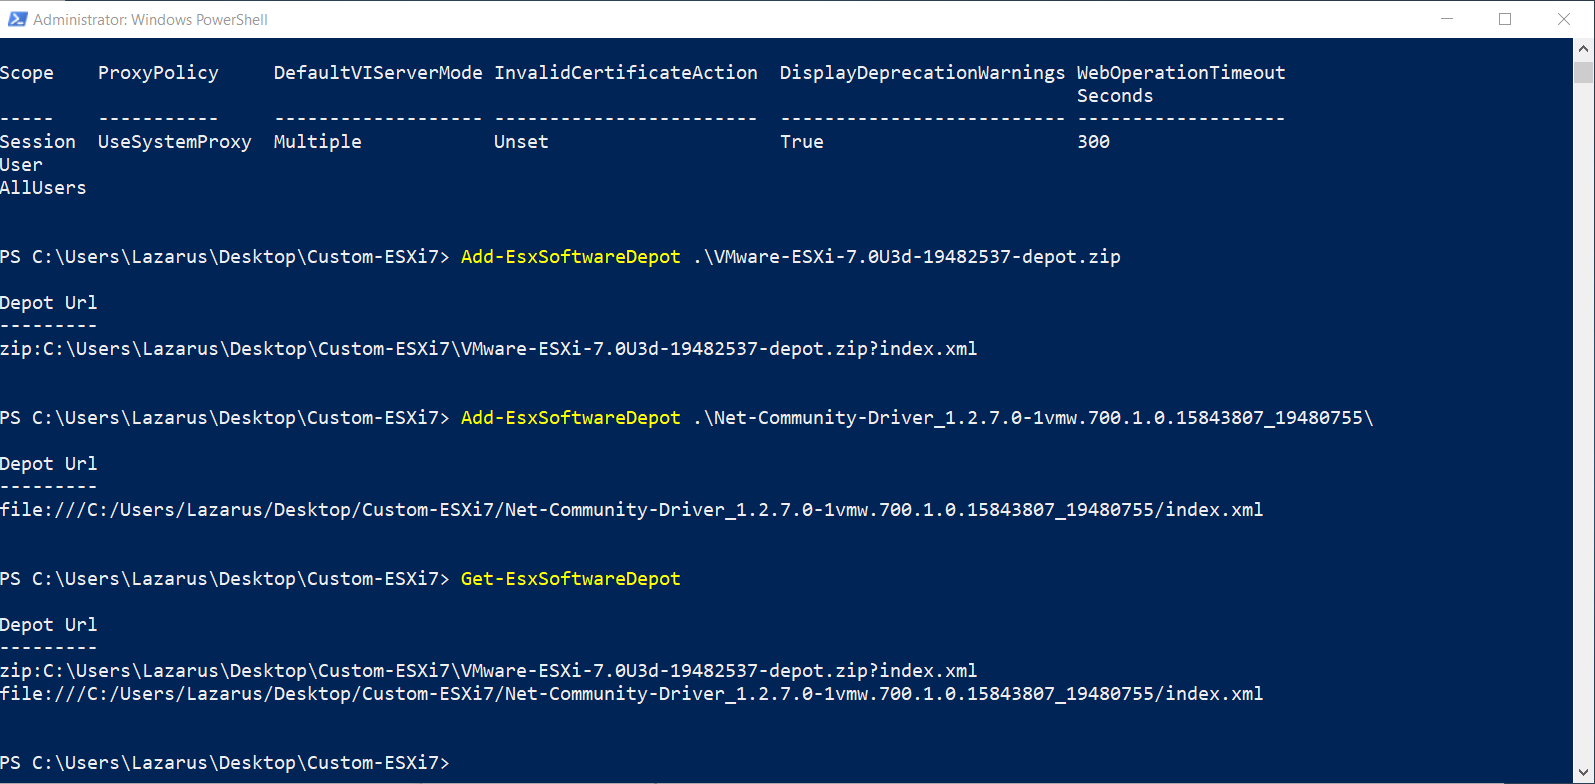
Ex. Get-EsxSoftwareDepot
- To see the software depots loaded into the current profile, type:
- Get-EsxImageProfile
- Copy the profile name of your choice and save it for referencing later. (We used Notepad to save the standard image name ESXi-7.0U3d-19482537-standard.
Ex. Verify available Get-EsxImageProfile
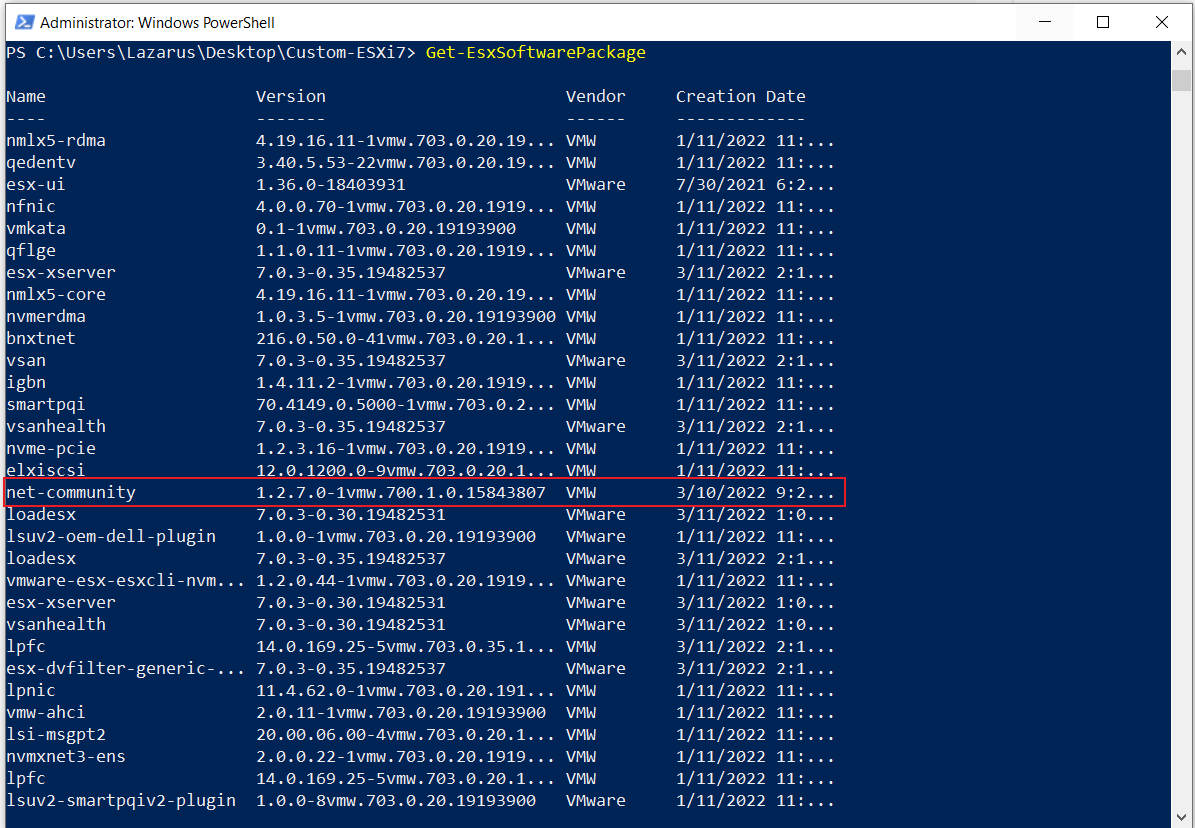
- Locate your software package after inserting the command below;
- Get-EsxSoftwarePackage
- Note: Copy the name and version to your Notepad; we used "net-community 1.2.7.0-1vmw.700.1.0.15843807"
- Get-EsxSoftwarePackage
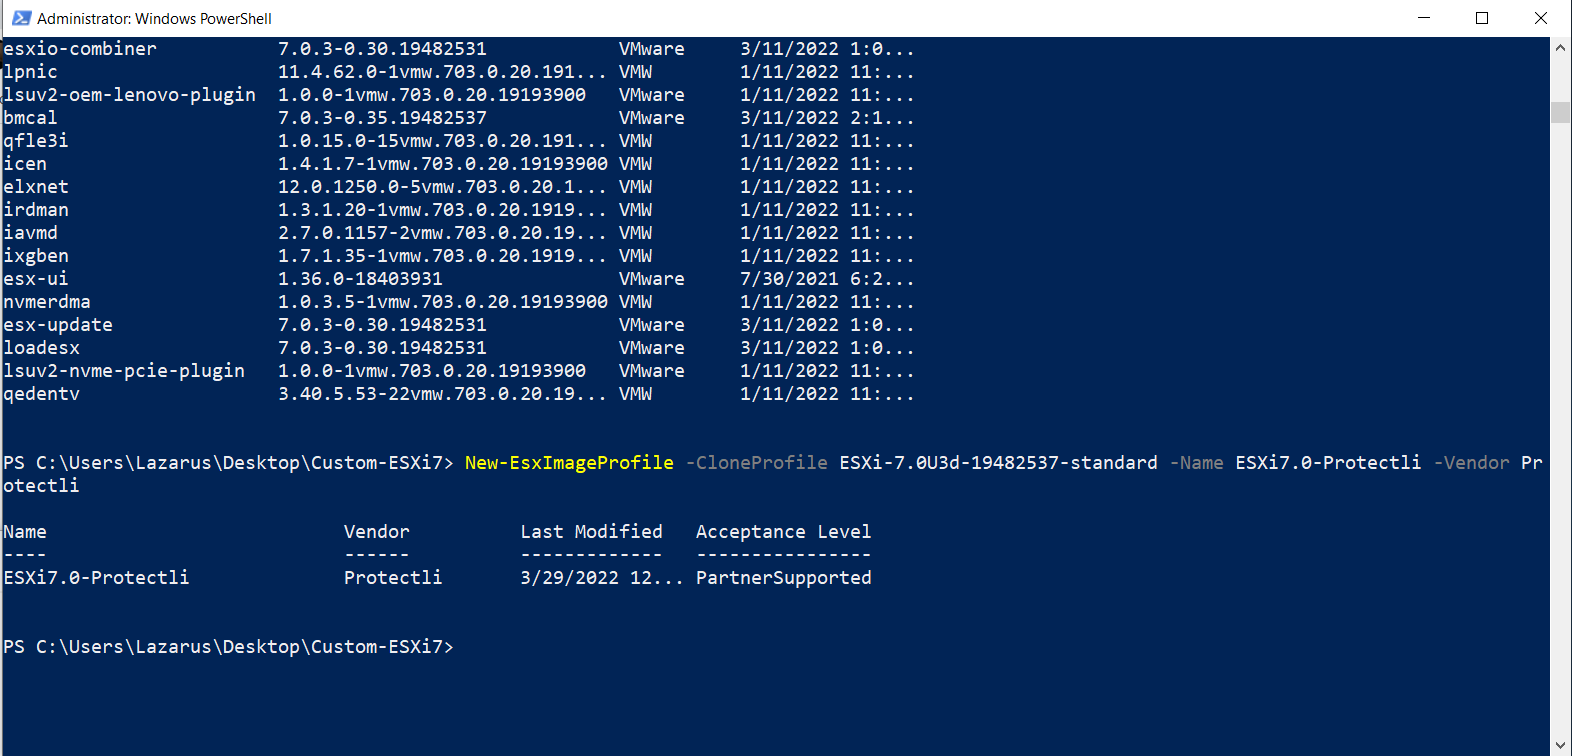
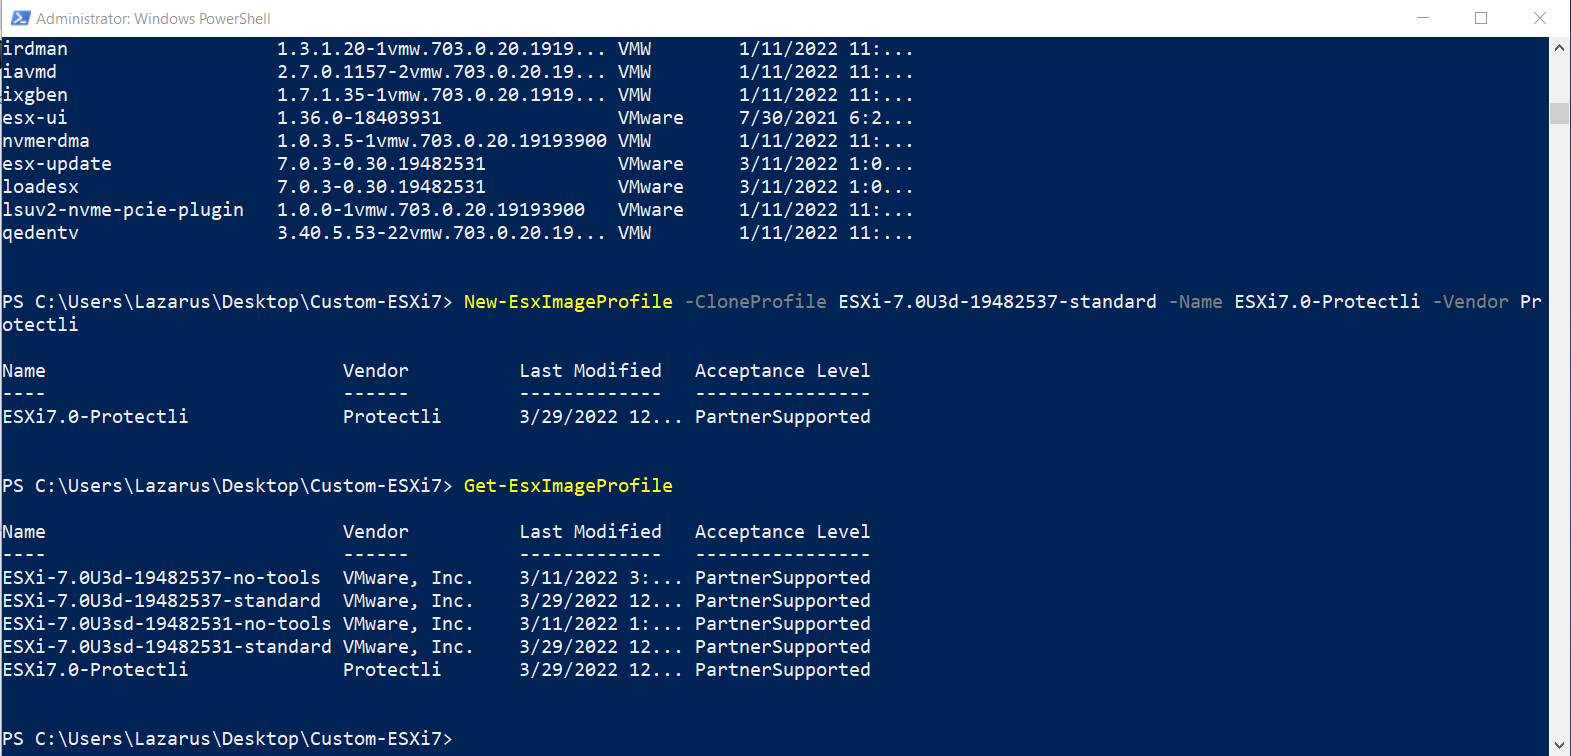
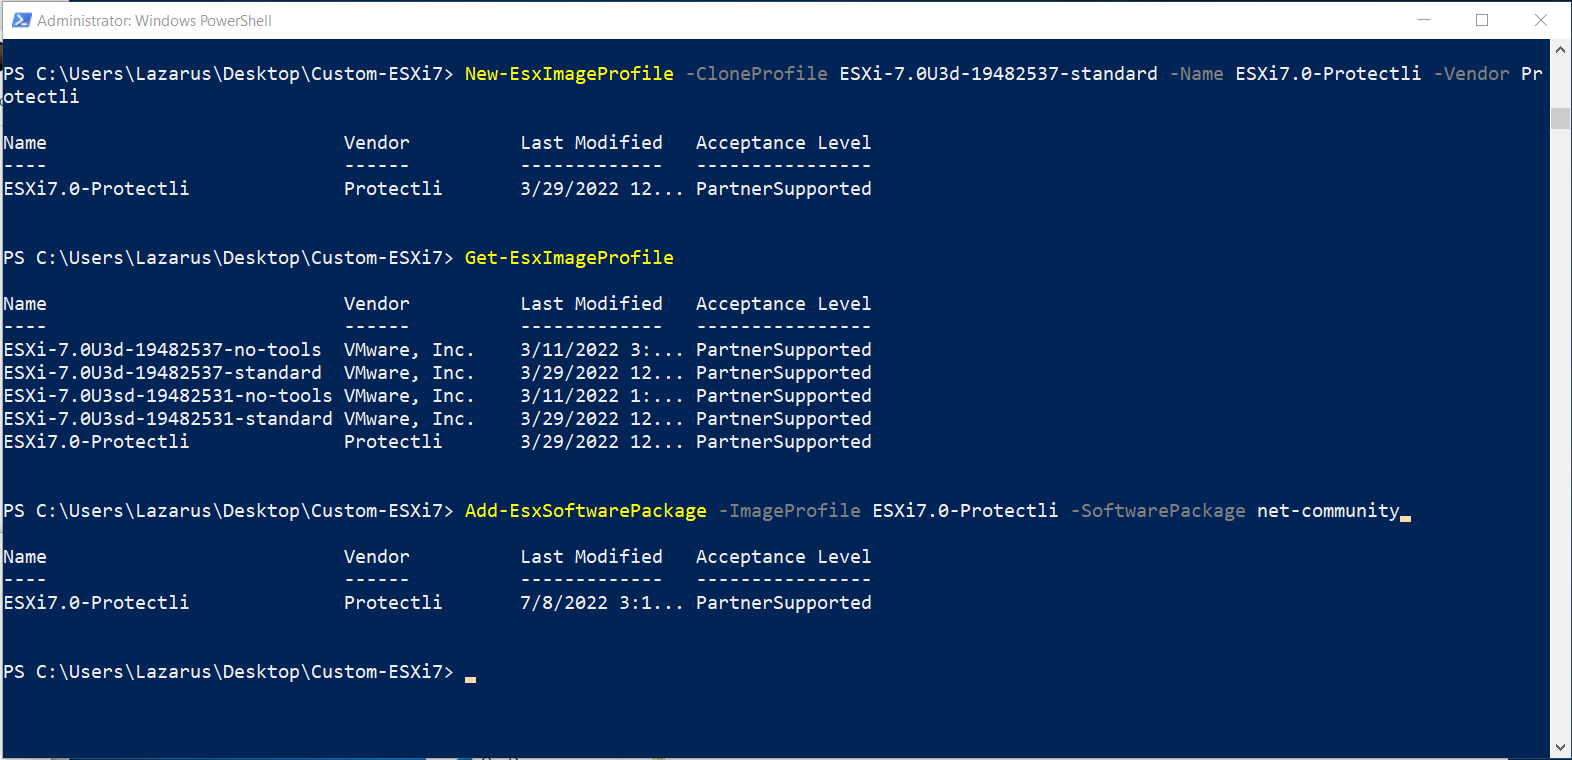
- To create your new image profile with the required drivers, enter the following. Note: ESXi recommends cloning their basis depot, then adding additional packages. You can name the new depot and set the vendor as you please.
- New-EsxImageProfile -CloneProfile ESXi-7.0U3d-19482537-standard -Name ESXi7.0-Protectli -Vendor Protectli
Ex. Create New-EsxImage Profile
- Verify your image profile is added to the original ImageProfile list with the command below.
- Get-EsxImageProfile
Ex. Verified Get-EsxImageProfile
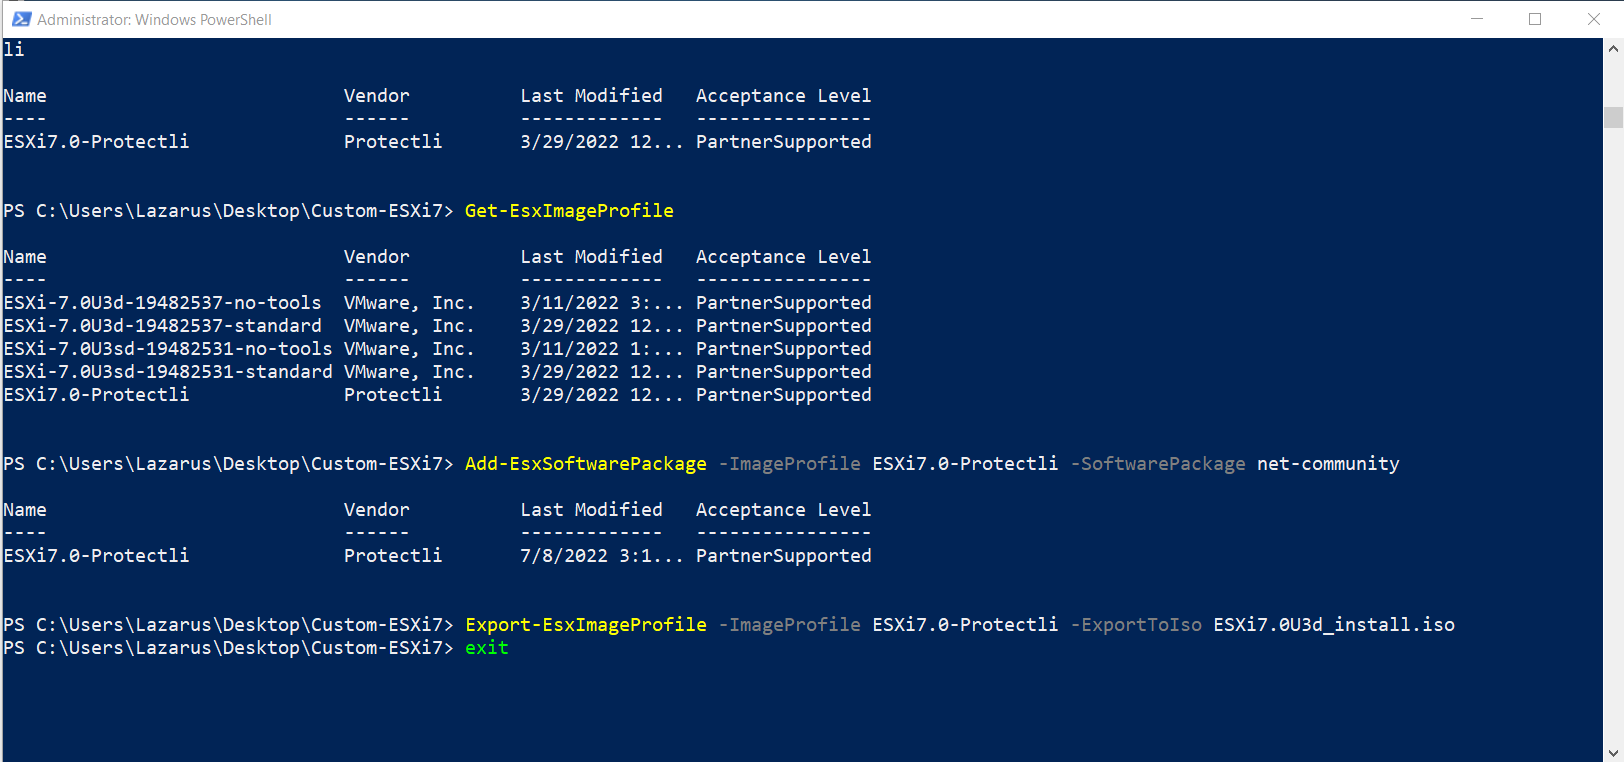
- Add the "net-community" package to your new image profile.
- Add-EsxSoftwarePackage -ImageProfile ESXi7.0-Protectli -SoftwarePackage net-community
Ex. Verified Add-EsxSoftwarePackage
- Create the ISO
- Export-EsxImageProfile -ImageProfile ESXi7.0-Protectli -ExportToIso ESXi7.0U3d_install.iso
Note: The new installation ISO is located in your current folder as shown in PowerShell.
Ex. Export-EsxImageProfile
NOTE: Everything stating our company name "Protectli" may be changed.
Install
At this point, your new ISO has been created, which now includes the I225 driver. Use our KB article "How to Create a Bootable USB drive for Software Installation" to create a new ESXi7 bootable USB.
See the video below, showing a successful boot to the ESXi7 installation page.
Video: ESXi7 Installation Page.
Verify
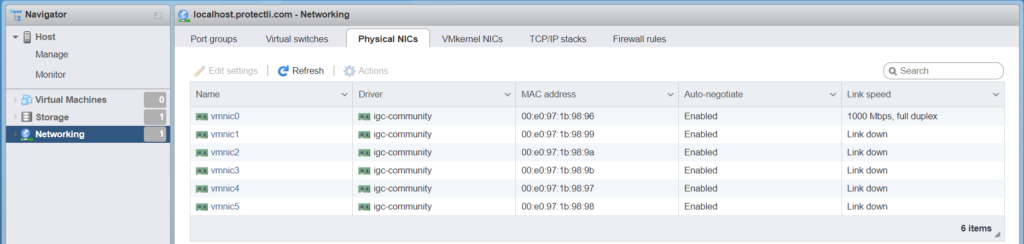
After completing VMware ESXi 7.0.3 Installer, verify the NICs are shown in the web GUI.
- Log in to your designated IP address, such as https://192.168.70.20/ui/#/host.
- Verify the Dashboard is displayed
- Select Networking on the left panel.
- Verify the Physical NICs tab is displayed on the top right.
- Verify all NICs are showing related to your vault, i.e., 2 through 6.
Congratulations, the I225-V drivers for ESXi7 were installed successfully. If you need additional assistance, please feel free to reach out at support@protectli.com. You can also find more information in our Knowledge Base.