Have a Question?
Troubleshooting the Vault
Overview
With minimal moving parts, overwhelmingly positive support/comments from the community, and thousands of units being utilized all over the world, the Protectli Vault has proven to be an extremely stable platform over the years. However, as with all computers, occasionally the Vault may have a hardware issue.
The most common issues that occur are usually due to faulty components – storage devices (mSATA SSD, NVMe, etc), memory (RAM), or CMOS.
This article will help the user diagnose and repair the majority of the problems that do occur. Please keep in mind that in some (rather uncommon) situations, major failures can occur with the CPU which would not be easily fixable yourself. If you have followed all the instructions on this page without solving your issue, you should reach out to our support team.
This article goes over a wide range of issues, please pay attention to the Table of Contents and see if your issue relates to anything mentioned. It may be worth reading through this entire article to narrow down your problem.
Accessing and Understanding Components
Protectli offers a few different series of Vault products. These include the FW Series, VP2400 series, VP4600 series, and VP6600 series. These all function similarly, but each product lineup may have unique features/components not found in another product lineup.
For a general overview and in-depth information for each lineup and what components are found in them, please refer to the following links:
In order to access the components: disconnect power, turn the unit upside down (heatsink facing downwards) and remove the 4 screws on the bottom plate. Please refer to the images in the articles above for information on each internal section of the Vault. An example of the bottom plate being removed can be seen on our video here.
Memory (RAM) Troubleshooting Instructions
Some issues are due to faulty RAM or system memory.
Note: RAM is REQUIRED to be installed in order for the Vault to run. If no RAM is present, or if it is faulty, the Vault will not boot and you will not see anything on the HDMI/Display Port/COM. If you hear multiple beeps emitting from the unit, you either have no RAM or faulty RAM installed. Check out this article for RAM we have tested with each unit.
In order to verify the presence or functionality of RAM in the Vault:
- Remove the bottom plate of the Vault and identify the components per the instructions in the previous section
- Verify that memory is properly installed. You can remove the RAM by pushing the clamps to the side and removing RAM at an angle. Reinsert the RAM at an angle, make sure it is fully inserted, and push back down until the clamps comfortable hold over the RAM
- An example of RAM being inserted into a Vault can be seen on this video
- If using a FW2B/4B/4C make sure the proper RAM is being used. These use DDR3L where the “L” is for “low voltage” of 1.35V. DDR3 requires 1.5V and is not compatible with these Vaults
- Verify the RAM is a model that we have tested
- If issues are still occurring, please run a memtest by following our guide
- If issue persists, try using a known-good RAM module
- If your issues continue after the above, your issue is probably not linked to bad RAM
SSD Storage Troubleshooting (mSATA, M.2 SATA, NVMe)
Some issues are due to faulty storage or solid state drive (SSD).
Note regarding installing brand new SSDs: Sometimes when you install a new SSD in your Vault, you may not seen it mentioned anywhere in the BIOS. Sometimes the SSD will not be visible in the BIOS until the drive has been partitioned or an OS has been installed. Verify that an OS sees the SSD during installation rather than immediately disregarding the SSDs functionality before it has been partitioned or had an OS installed to it.
In order to verify SSD storage presence or health, follow these steps:
- Remove the bottom plate of the Vault and identify the components per the instructions in the Accessing and Understanding Components section above
- On FW series Vaults, there are two PCI sockets. Only one of these supports an SSD. Make sure you have installed the mSATA SSD in the correct slot and that it is fully seated. Refer to the hardware overview article for the Vault in question.
- VP series Vaults have a few different M.2 connectors. Make sure you have installed an SSD in the slot designated for SSDs. Refer to the hardware overview article for the Vault in question.
- The VP2400 DOES NOT work with M.2 NVMe. It only accepts M.2 SATA SSDs.
- You can use a tool like smartmontools on Linux to test the health of an SSD
- If your issue continues, try replacing it with a known good SSD
- If your issue persists, it may be unrelated to the SSD
CMOS Reset Instructions
The Vault’s CMOS is a small amount of battery backed memory that contains basic system information for the BIOS. Occasionally the CMOS on the Vaults can get into a state where it needs to be reset. If your unit isn't booting, video isn't displaying, certain components aren't being seen, a NIC has seemingly stopped working, or if any other odd issues arise, a CMOS reset may help.
There are two pins on the motherboard of each Vault that can be shorted for 10-15 seconds to reset the CMOS. Make sure the unit is unplugged from power when you do this! Instructions on how to do this, and the locations of the pins can be found on this article.
Physical Damage
External damage to the chassis of the Vault very rarely causes actual functionality issues, but damage to component connectors or ports can certainly be problematic.
Examine the Vault for any obvious damage that could have occurred during shipping, installation, or while in service.
Verify that all of the ports (USB, HDMI, etc), connectors (mSATA, RAM slot, etc), and power button are properly positioned in the chassis and function as expected.
If there is noticeable damage to one of these aspects of the Vault, please open up a support ticket on our website.
Loose Components or Screws
There are occasions where a screw that is supposed to be screwed into a standoff on the motherboard becomes loose during travel. We haven't seen any major issues occur because of this, especially if it is caught before the Vault is plugged in and powered on.
- Shake the Vault gently when received
- Verify that there are no sounds to indicate a loose screw or component
- If it sounds like something is loose, open up the unit by removing the four screws on the bottom plate, and investigate
- If you find any screws rattling around, remove them before powering on the unit
- Make sure all components are properly seated and screwed down
Basic Troubleshooting
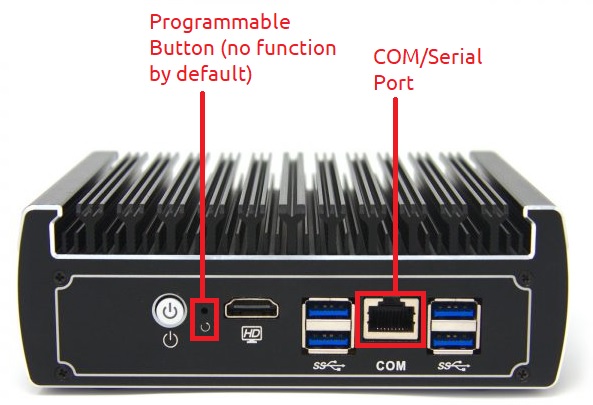
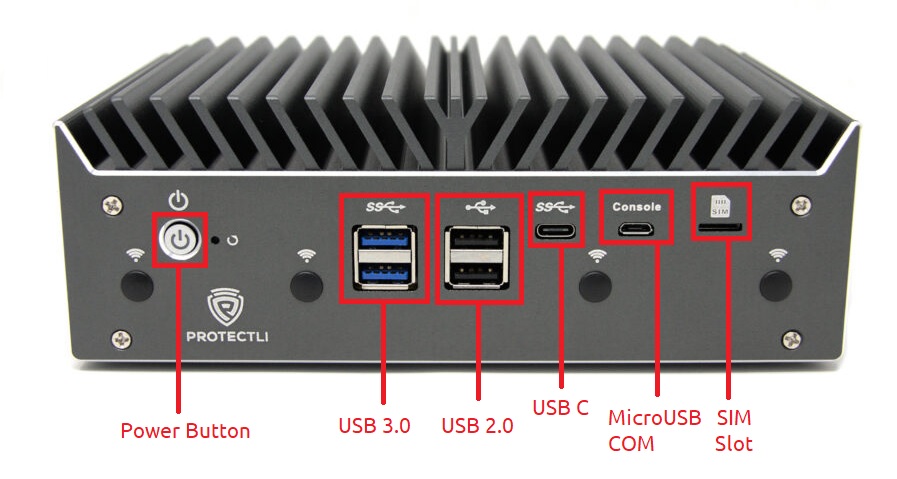
See images below for basic Vault interfaces that may be found on multiple products:
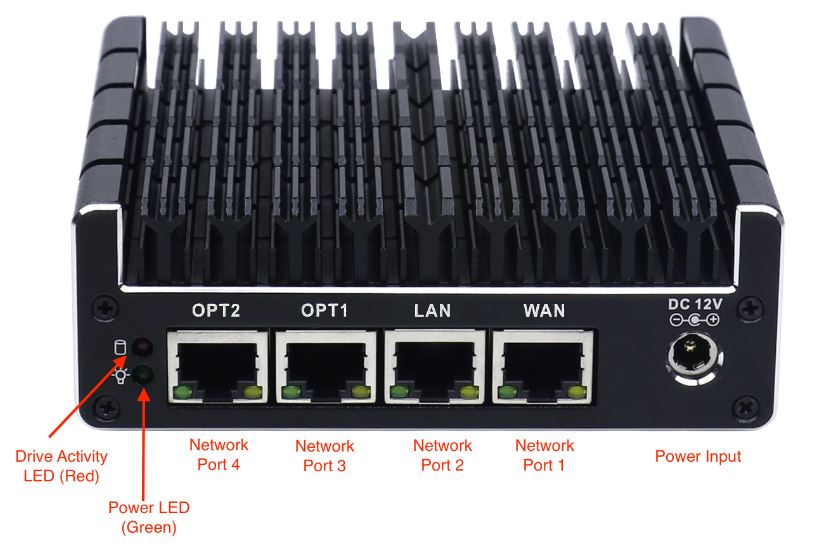
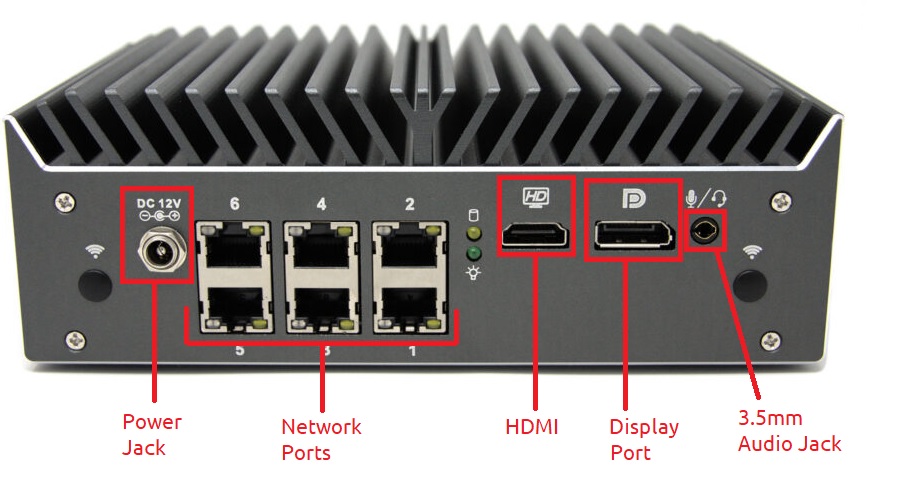
- Plug one end of the power cable into a live AC power outlet and the other end into the DC power adapter.
- Verify both connections are secure
- Verify the LED on the DC power adapter is illuminated (may be a green or blue light)
- Connect one end of a video cable to either the HDMI or Display Port connector depending on the model of the Vault. Connect the other end to the appropriate connection of a video monitor.
- Please keep in mind we have had issues with some Dell monitors, if you aren't getting video display, try using a different monitor or TV
- Verify connections are secure
- Verify the video monitor is configured to use the correct interface for the Vault or the monitor can auto select the correct interface
- Connect a keyboard and mouse to the USB ports on the Vault
- Do not use a wireless keyboard/mouse. If you are using a gaming keyboard, you may need to disable any custom profiles and select a "BIOS Mode" which may be a physical toggle on the keyboard
- Verify connection is secure
- Plug the DC power cable into the power jack of the Vault
- Verify the power button's LED is illuminated
- Verify that the LED signifying power on the front panel is illuminated
Issues
No Video
Investigate the video screen and verify that the system boots up. You may see a Protectli splash screen image, the BIOS menu, or an OS loading.
There are a few reasons why you may not be receiving video display. A few common reasons will be explained below:
1. It may be due to a "barebones" unit. In other words, there is no RAM or SSD installed in the device when it ships from the factory. If you purchased a "barebones" unit, you will need to at least install RAM in the unit before the unit can boot and display video.
2. Your RAM is loose or incompatible RAM is installed. Verify that RAM is seated fully in the RAM slot. Verify that it is RAM from our tested list.
3. It may be due to an incompatible monitor being used. Some monitors (mostly Dell monitors from our experience) do not play well with the Vault. If you can hear a single beep emit from the Vault, but are not seeing display output, try using a different monitor or TV. Make sure you restart the Vault when connecting to a new display.
4. It may be due to a video display adapter being used. Please use a straight-through HDMI to HDMI, or Display Port to Display Port cable with the Vault. If you are using some kind of adapter to change display outputs, you may run into issues.
5. It may be required for you to perform a CMOS reset. Follow this guide on how to perform a CMOS reset and see if the behavior continues.
If you still are not receiving video output, please reach out to our support team.
Vault is Booting Directly to BIOS or UEFI Shell
If Your Vault is Booting Directly to the BIOS
- Verify that your SSD is properly installed and seated in the designated slot on the motherboard
If SSD is properly in place:
- Perform a CMOS reset
- Afterwards, power the unit on and verify video displays and boots
If that doesn't help:
- Follow the "SSD Storage Troubleshooting" section on this article
- Make sure your OS installation didn't become corrupt
- Try booting to a USB drive with an OS installer image on it
- Verify if you can reinstall an OS on the SSD
- Verify that the unit can boot to the SSD afterwards
If Your Vault is Booting Directly to a UEFI Shell or Network Boot Option
Your boot order may not be correct or an OS is not installed on the SSD. First, make sure you have an SSD installed in the unit. Second, make sure an OS has been installed on the SSD. Finally, you will need to change the boot order:
This problem can happen on units with UEFI coreboot (especially on the FW4C or VP Series Vaults).
- Hold <DEL> at the time of boot to access the coreboot menu
- Navigate to Boot Maintenance Manager > Boot Options > Change Boot Order
- Press <Enter> to select the first option that shows all your boot options
- Use arrow keys to highlight over the SSD
- Press <Shift> and <+> keys at the same time to move it up to the top selection
- You may need to move it up multiple times if there are multiple boot options
- Hit <Enter>
- Hit <F10> to save
- Reboot
No Operating System (OS) Found
If the device boots and the following message or similar is displayed on the screen:
“Reboot and Select proper Boot device or Insert boot Media in selected Boot device and press a key”
This means that the device has booted correctly, recognized the SSD as a bootable device, and there is no OS installed on the SSD.
Protectli does not install a default OS on orders shipped from Amazon, so this is expected. If this happens on a unit that you purchased from our website, and you selected an OS as a preinstall option, there are a few things that could have happened.
1. The SSD became loose during travel somehow. Please try reseating the SSD
2. The OS was not actually installed. Please let us know if this happens. If you are comfortable doing so, install the OS yourself. We have multiple guides on our Knowledge Base on how to install different OS.
3. The boot order is incorrect. This can commonly happen on units with UEFI coreboot (FW4C and VP Series). To change boot order:
- Hold <DEL> at the time of boot to access the coreboot menu
- Navigate to Boot Maintenance Manager > Boot Options > Change Boot Order
- Press <Enter> to select the first option that shows all your boot options
- Use arrow keys to highlight over the SSD
- Press <Shift> and <+> keys at the same time to move it up to the top selection
- You may need to move it up multiple times if there are multiple boot options
- Hit <Enter>
- Hit <F10> to save
- Reboot
OS Installation Issues
Problems installing an OS are typically related to the specific OS image and/or the method used to create the installation image.
We have noticed that Balena Etcher will sometimes not successfully create a bootable image unless you select the CD installer (or .iso) image of the OS. This is typically an option for download opposed to an USB image (.img).
Always double check that you are using the correct image when burning a USB. Make sure you have actually burned an image to a USB using Rufus or Balena Etcher, and that you didn't just "drag and drop" an image onto a USB drive.
Some OS are legacy BIOS only (like Sophos), so these will not work on a UEFI system like the FW4C with coreboot or VP series Vaults. Some versions of OS's will not support specific NICs (network interfaces), so always be aware of what limitations certain versions of a specific OS has. For example, older versions of XCP-ng do not support 2.5GbE NICs.
Specific instructions for many popular OS can be found on the Protectli Knowledge Base page at this link.
Can't Install OS via COM/Serial Port
If an OS cannot be installed via the Serial COM port, there are a few things to try and acknowledge.
- Verify the COM port session has been configured correctly. Verify the correct COM cable drivers have been installed if necessary. See this link for a guide.
- Verify the image used for OS installation supports the COM port. Some OS installations require a specific image to use the COM port.
- Some Linux OS like Ubuntu require additional configuration to view COM output, check out the article from Ubuntu on how to do so. Refer to the official documentation of whatever OS you are trying to install
Vault Crashes or Reboots
If the Vault “crashes” or performs erratically during boot up, installation, or while in service:
- Follow the SSD Storage Troubleshooting instructions above, if it continues:
- Follow the Memory (RAM) Troubleshooting instructions above, if it continues:
- Follow the CMOS reset instructions above, if it continues:
- This may be due to a corrupt OS. If possible, create a backup of the OS you are using and reinstall the OS completely
- If the issue persists, this could simply be a software issue. Perform your due diligence by searching information online about the error you are getting with the OS you are using
- Forums and Reddit communities are some of the best ways to learn about issues other people have had
- If you are at a complete loss with what could be going wrong, reach out to our support team and provide details on what OS you are using and what the issue is. We cannot help with software configuration, but we can at least get you going in the right direction if we determine it is just a software issue
- https://forum.netgate.com/
- https://forums.freebsd.org
- https://forum.opnsense.org/
- https://www.microsoft.com/en-us/itpro/windows/support
- https://ubuntuforums.org
- https://forum.vyos.io
- https://forums.edge.arista.com/
- https://community.sophos.com/community-chat/
- https://communities.vmware.com/
- https://forum.proxmox.com/
No Network Connectivity
There are a few reasons why network connectivity is not working as expected. In general, it is always a good idea to verify the health of your ethernet cables and other network hardware in your setup. Make sure the OS has been configured correctly, especially when it comes to firewall rules, DHCP, and network subnetting. Make sure that there are no other routers/equipment before the Vault that could be affecting the flow of traffic.
If a NIC (ethernet port) LED light stays illuminated even when nothing is connected: Please perform a CMOS reset and see if the behavior continues. If the issue continues, please reach out to us.
If a NIC was working as expected previously and suddenly is no longer working: please power off the unit, unplug it from the wall, and perform a CMOS reset. Verify that the NIC works as expected afterwards. If it continues to not work, make sure the ethernet cable is good as well as whatever the cable is connected to is working as expected (whether a switch, modem, etc).
If you are running a firewall OS like OPNsense or pfSense® CE, and you are not getting a WAN connection or WAN IP: Verify the Ethernet cable is good, keep the Vault turned on, make sure the Vault's WAN connection is connected to your modem/ISP connection, reboot the modem while the Vault is still turned on, keep an eye on the console menu/GUI of the OS and verify that a WAN address is shown after the modem completely reboots.
If you are not getting an internet connection on an OPT port while using a firewall OS like OPNsense or pfSense® CE: Make sure that the OPT ports have been setup correctly with a valid IP, subnet mask, DHCP range, and firewall rules. Please follow our instructions for setting up OPT ports on pfSense® here, and for OPNsense here.
Vault Feels Like It is Running Too Hot
The average running temperature of each Vault will vary slightly depending on the CPU and what OS is running. Higher powered CPUs will realistically run a bit hotter, and more intensive OS processes will cause the unit to run at a higher temperature. Realistically when the unit feels hot, this just means the heatsink design of the Vault is working as intended. Some OS may push the CPU to high temperatures (sometimes ~70C) for small periods of time, especially under heavy load.
The Vault should automatically regulate temperature in most cases, make sure your OS is up-to-date and that necessary drivers are installed when using an OS like Windows.
As a general rule of thumb:
- Verify adequate ventilation around the Vault
- Verify the ambient temperature of the location where the Vault is installed. Operating temperature is from 0 C to 50 C
Conclusion
We expect that this troubleshooting guide has the information to resolve most common issues that occur with the Vault. However, if there are still unresolved issues, feel free to reach out to our support team, or find more information in our Knowledge Base.