Have a Question?
pfSense® Optional Port Configuration
In this example, we will be configuring OPT ports for a VP4670 with IPv4 addresses. Use this set of instructions if you don't want to configure the OPT ports through the WebGUI. The instructions will basically be the same for any Vault product, but NIC drivers/names might be different with your Vault. Vaults will typically use either igb, igc, or ixl NIC drivers.
- First, access the console menu either by using a monitor and keyboard attached to the Vault, or via serial COM output
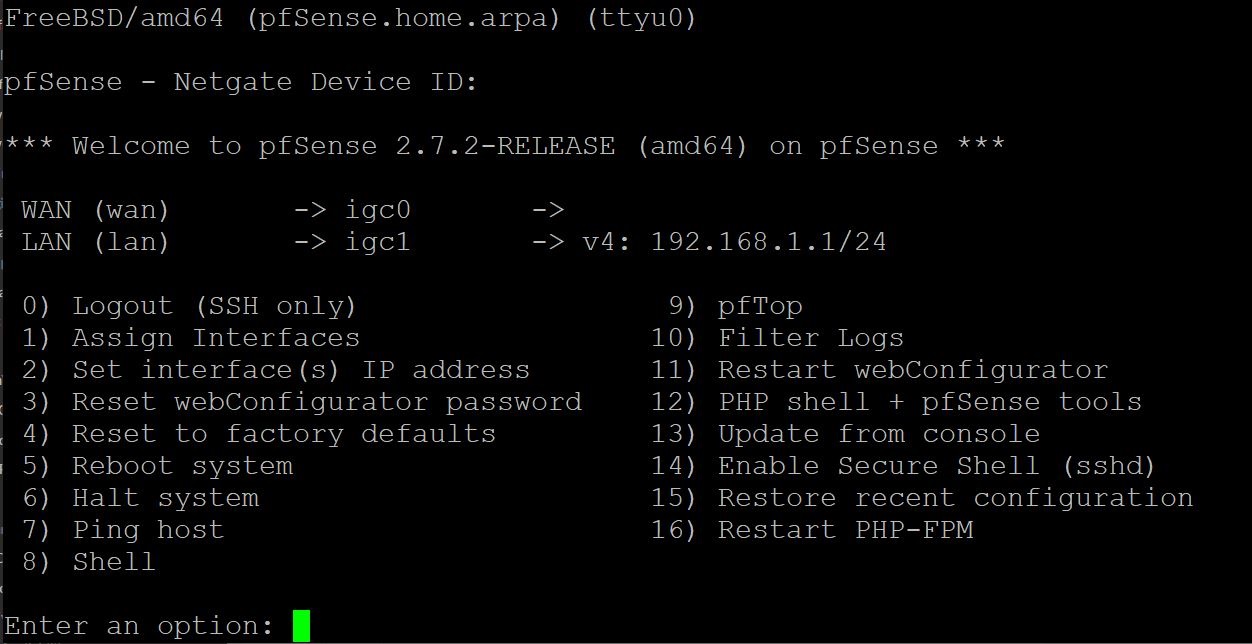
- In this example, we only have WAN and LAN setup. We need to add the other interfaces
- Type "1" and hit <Enter> key
- For "Should VLANs be set up now?": type "n" and hit <Enter> key
- For WAN interface name, type igc0 (pay attention to your NICs, this could be igb0 or ixl0) and hit <Enter> key
- For LAN interface name, type igc1 (or igb1, ixl1 depending on NICs)
- For Optional 1 interface name, type igc2 (or igb2 depending on NICs)
- Continue this trend until all OPT ports have been assigned a NIC and you are asked to proceed. Keep in mind this example is for a 6 port Vault, but if you have less ports, you will have less OPT ports
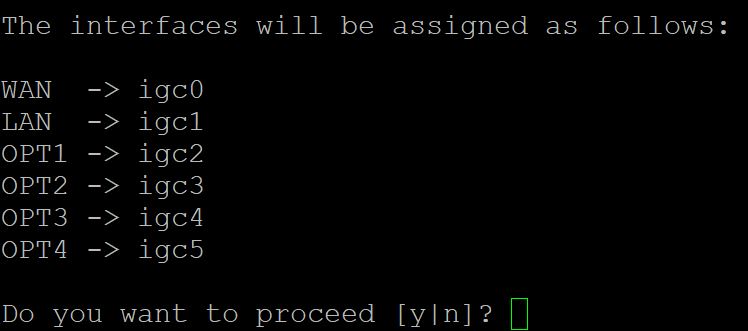
- Type "y" and hit <Enter> key
- Wait a bit for the configuration to apply
- When you see the main console menu again, type "2" (option to assign IP address) and hit <Enter> key
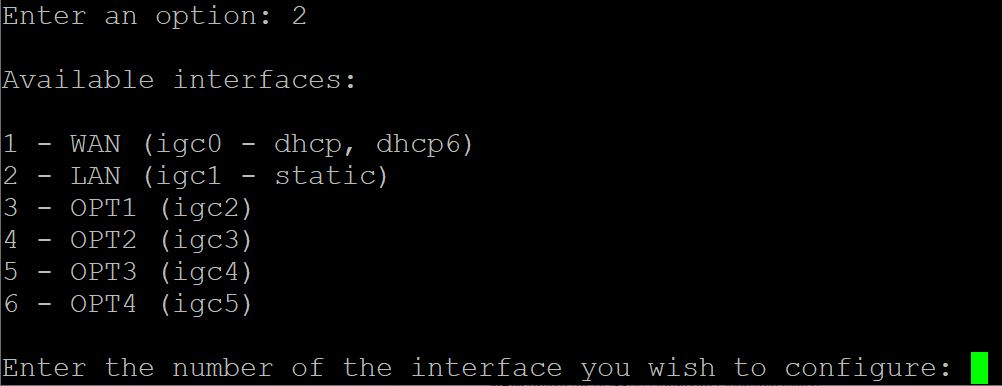
- Type "3" and hit <Enter> key to start modifying OPT1
- Configure IPv4 Address OPT 1 interface via DHCP? : type "n" and hit <Enter> key
- You will be prompted to enter the new OPT 1 IPv4 address. You can make this any IP address you desire, but for this example we will set it as 192.168.10.1
- Make sure that when you configure these IPs you won't be conflicting with any other devices on your network
- Type 192.168.10.1, hit <Enter> key to confirm
- We will use 24 for the new OPT1 IPv4 subnet bit count, type 24 and hit <Enter> key
- Hit <Enter> key when prompted for new OPT1 IPv4 upstream gateway, please leave this section blank and do not type anything else
- When asked to Configure IPv6 via DHCP6, type "n" and hit <Enter> key
- When prompted to enter new OPT1 IPv6 address, press <Enter> key to skip
- When asked to enable the DHCP server on OPT1, type "y" and hit <Enter>
- For our example, when asked to enter the start address, we will type 192.168.10.2 and hit <Enter> key to confirm
- For end address, we will type 192.168.10.254 and hit <Enter> key
- When asked to revert to HTTP, type "n" and hit <Enter> key
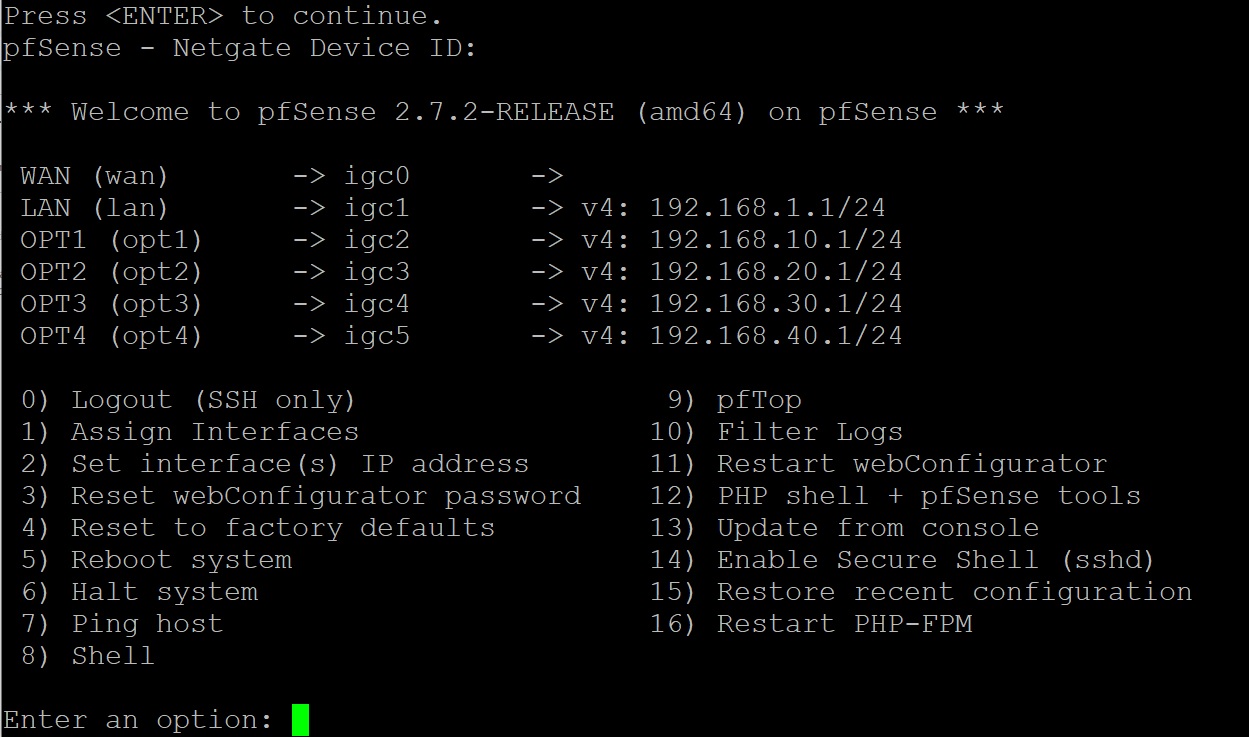
- This will now finalize your options and provide you with a success message

- In order to do this for the other OPT ports, repeat the above steps, but use a different IP address for each interface.
- For example, you can use 192.168.20.1 for OPT2, 192.168.30.1 for OPT3, and so on and so forth
You may need to reboot the Vault one time, but you realistically should be good to go to plug in devices to each ethernet interface and acquire an IP address. However, you will need to configure Firewall rules via the webGUI now. Please refer to the Setting Firewall Rules section of this article.
Working through the WebGUI may be a more familiar and friendly experience for users. In the following example, we are configuring a VP4670. Please keep in mind your NICs may be named differently if you have a different Vault product.
- Access your pfSense webGUI and login
- Go to Interfaces > Assignments
- Next to Available network ports: select igc2 (or whatever your NIC is labeled as) and click the green "+ Add" button
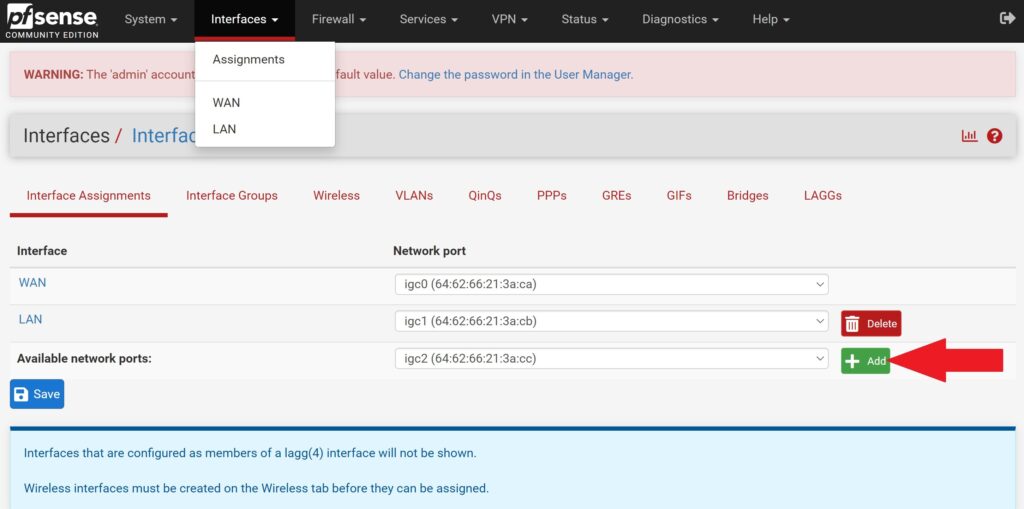
- Repeat this process for each OPT port
- Save changes once all Interfaces are assigned
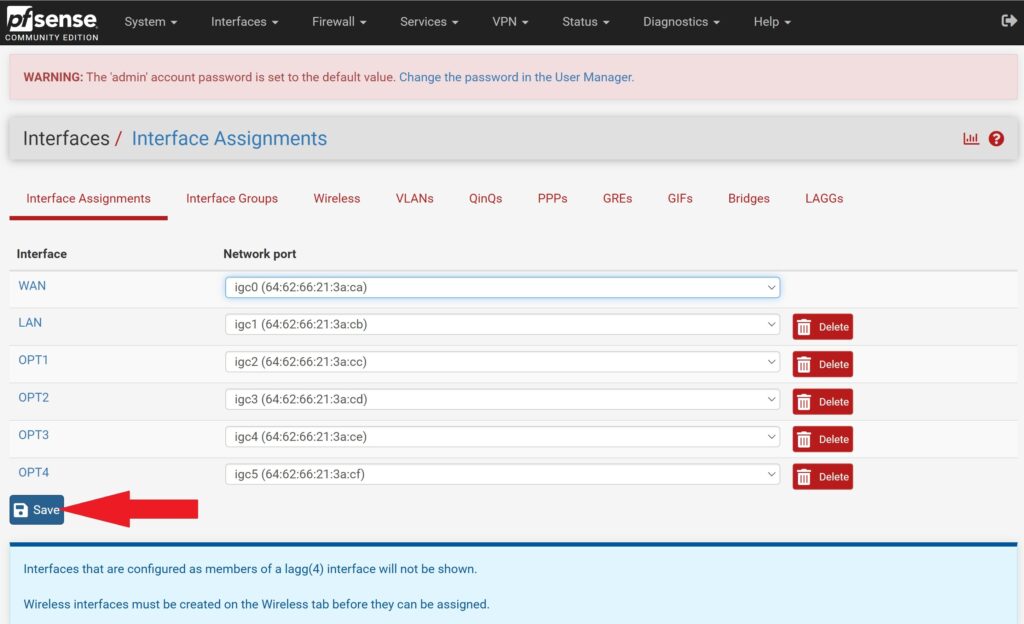
- You now have all interfaces assigned, but they do not yet have an IP address or a DHCP range, so they are relatively useless at this point
- While on the Interfaces > Assignments menu, click on the OPT1 interface name to open up it's settings
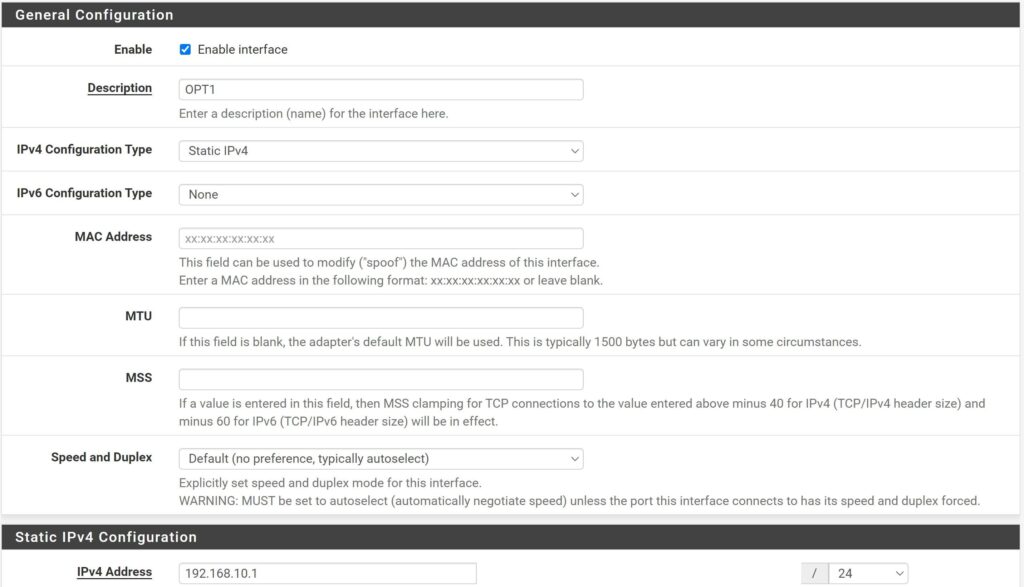
- Enable the interface
- Select Static IPv4 for IPv4 Configuration Type
- Under the "Static IPv4 Configuration" section, enter an IPv4 address and select a subnet mask
- We choose 192.168.10.1/24 for this example:
- Save settings towards the bottom of the page, then apply changes at the top of the page
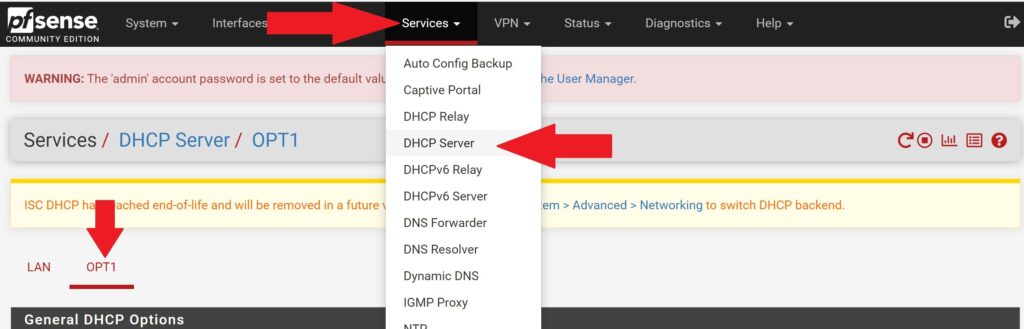
- Now we need to enable DHCP
- Go to Services > DHCP Server
- Select OPT1 to access the DHCP options for this interface
- Enable DHCP server on OPT1 interface
- Scroll down to "Primary Address Pool" section
- For Address Pool Range, enter 192.168.10.2 and 192.168.10.254
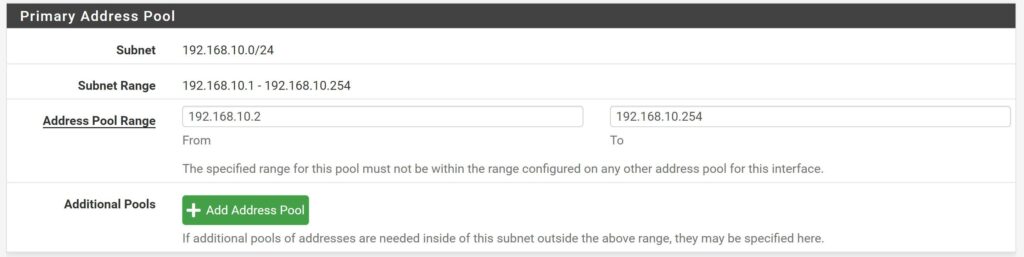
- Save settings at the bottom of the page, and apply changes at the top of the page
- You should repeat the same steps found above for each OPT interface you want to configure. Just make sure to use different IP addresses and ranges for each OPT port. For example, you could configure OPT2 with a static IP of 192.168.20.1/24 with a range of 192.168.20.2 – 192.168.20.254, etc
- Now you have a DHCP range but you do not have Firewall rules setup to actually access the internet. Let's get those configured.
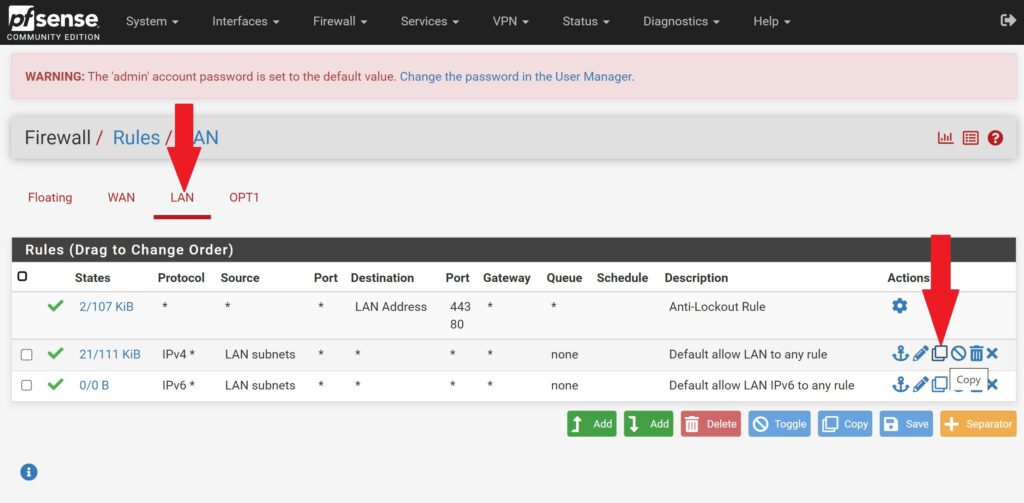
- Navigate to Firewall > Rules
- To make things easy, we can just copy the existing LAN firewall rules and translate them over to the OPT1 interface.
- Click on LAN rules, and Copy the Default allow LAN to any rule
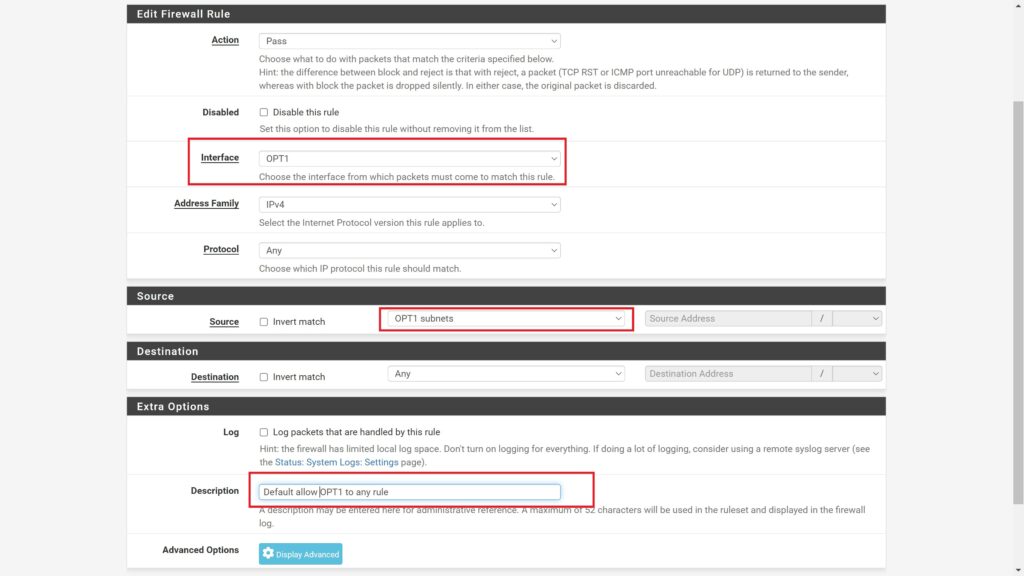
- You will be taken to a new page
- Change the Interface to OPT1
- Change Source to OPT1 subnets
- Change the Description to match the OPT1 port info (not required but helps)
- See example below:
- Save settings and apply settings
- You can now repeat these steps for each OPT interface you have configured