Have a Question?
Installing OS and setting Boot Order with coreboot on the VP2410
Overview
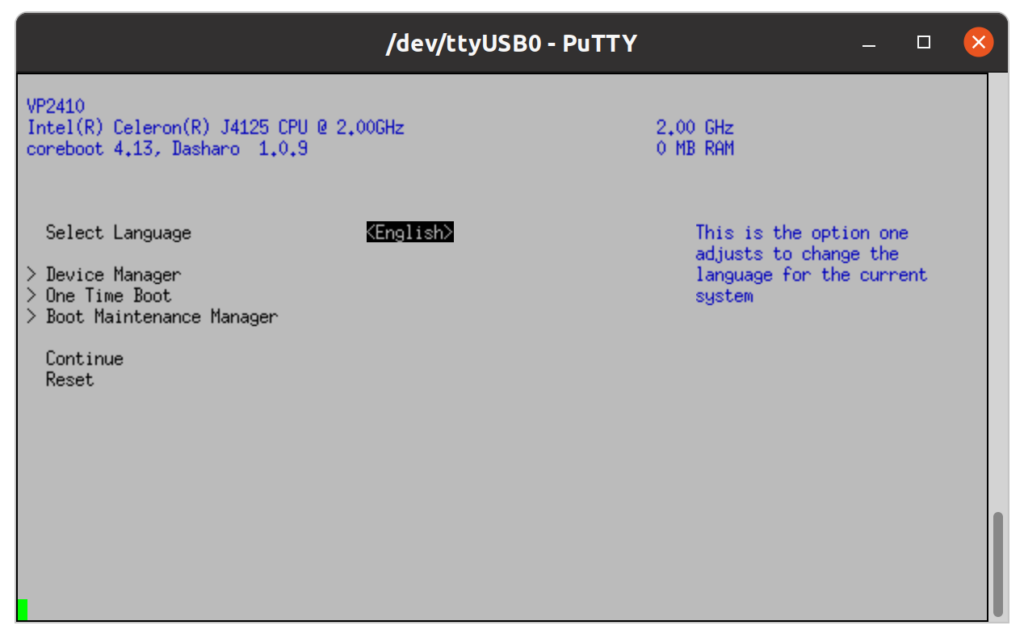
The VP2410 is the first model of the new Protectli Vault Pro (VP) series. coreboot for the VP2410 has been implemented via UEFI rather than the legacy BIOS method. The original Legacy mode coreboot menu only allows selecting the Boot Device/Method or, in some cases, running a MemTest. The coreboot UEFI BIOS menu is more extensive and has different behavior than coreboot on other Protectli Vaults. Specifically, this version of coreboot does not support a pre-defined boot order. Therefore, some Operating System (OS) installations require manually editing the Boot Order in the BIOS after the OS is installed. See the instructions below for specific OS. There is a an overview article in the Knowledge Base about the VP2410 coreboot BIOS menu at:
https://kb.protectli.com/kb/coreboot-on-the-vault-pro/
This article describes the behavior of specific OS during installation and whether the Boot Order in the BIOS needs to be changed. This article assumes a new installation of an OS on a new or empty M.2 SATA module on a VP2410.
pfSense® CE
The instructions to download pfSense® CE and burn the image to a USB drive can be found at this link: https://kb.protectli.com/kb/how-to-install-pfsense-ce-2-4-on-the-vault-2/
When pfSense® CE is installed on the VP2410 with coreboot, the installation drive will typically be placed last in the list of boot devices. In order to change the boot order, see the instructions below for "Installation and Boot Order" which show how to move the "SATA SSD" to the top of the list.
OPNsense
The instructions to download OPNsense and burn the image to a USB drive can be found at this link: https://kb.protectli.com/kb/how-to-install-opnsense-on-the-vault/
When OPNsense is installed on the VP2410 with coreboot, the installation drive will typically be placed last in the list of boot devices. In order to change the boot order, see the instructions below for "Installation and Boot Order" which show how to move the "SATA SSD" to the top of the list.
Ubuntu
The instructions to download Ubuntu and burn the image to a USB drive can be found at this link: https://kb.protectli.com/kb/how-to-install-ubuntu-on-the-vault/
When Ubuntu is installed on the VP2410 with coreboot, it will create a label "ubuntu" for the boot file and automatically place it first in the list of boot devices. No changes are needed in the BIOS. The unit will automatically boot to Ubuntu. See the Ubuntu screenshot below for an example of the Ubuntu label and boot order.
CentOS
The instructions to download CentOS and burn the image to a USB drive can be found at this link: https://kb.protectli.com/kb/how-to-install-centos-on-the-vault/
When CentOS is installed on the VP2410 with coreboot, it will create a label "CentOS" for the boot file and automatically place it first in the list of boot devices. No changes are needed in the BIOS. The unit will automatically boot to CentOS.
XCP-ng
The instructions to download XCP-ng and burn the image to a USB drive can be found at this link: https://kb.protectli.com/kb/xcp-ng-on-the-vault/
When CentOS is installed on the VP2410 with coreboot, it will create a label "XCP-ng" for the boot file and automatically place it first in the list of boot devices. No changes are needed in the BIOS. The unit will automatically boot to CentOS.
Other OS Not Listed Here
There are many other OS that can be installed on the VP2410 with coreboot, but as noted above, they must be UEFI images. If it is a Linux/Debian OS, it will typically create a label and place it first in the list. If it is a FreeBSD or similar based OS, then the SATA SSD or similar device will be placed at the end of the list and must be manually moved.
Installation and Boot Order
This section assumes a new installation of an OS on a new or empty M.2 SATA module on a VP2410 that does not automatically create a label and insert it at the top of the list of boot devices. Follow the instructions in the OS specific Knowledge Base article to install the selected OS in UEFI mode. If the boot order needs to be changed, reboot into the BIOS menu and follow these instructions.
- After installation is complete and when prompted to Reboot, select "Reboot"
- When the unit is rebooting and the splash screen is displayed, press the DEL key
- Verify the BIOS menu is displayed
- Select "Boot Maintenance Manager"
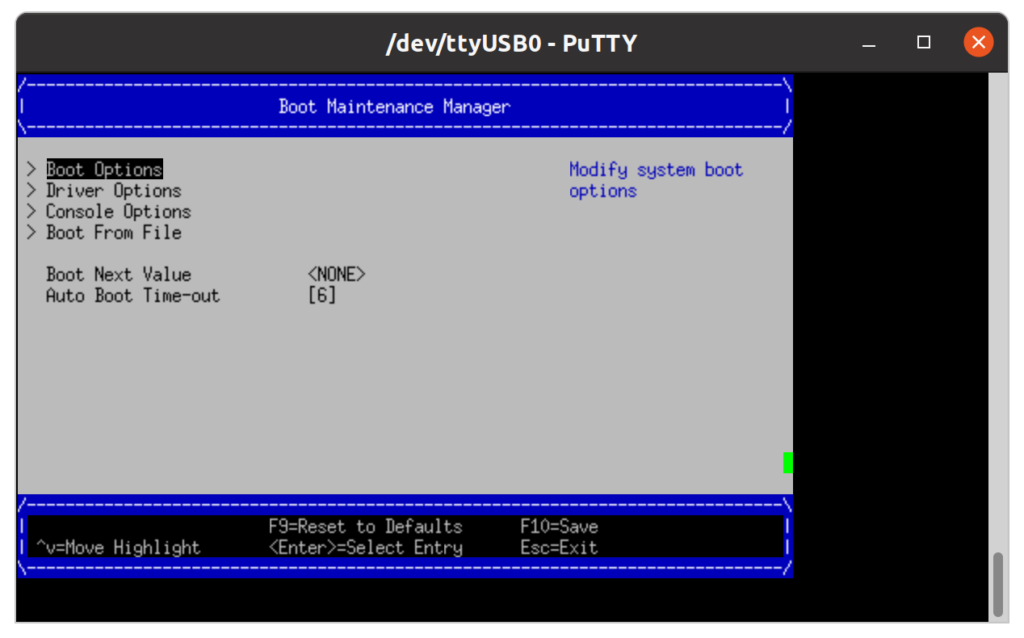
- Verify the Boot Maintenance Manager page is displayed
- Select "Boot Options"
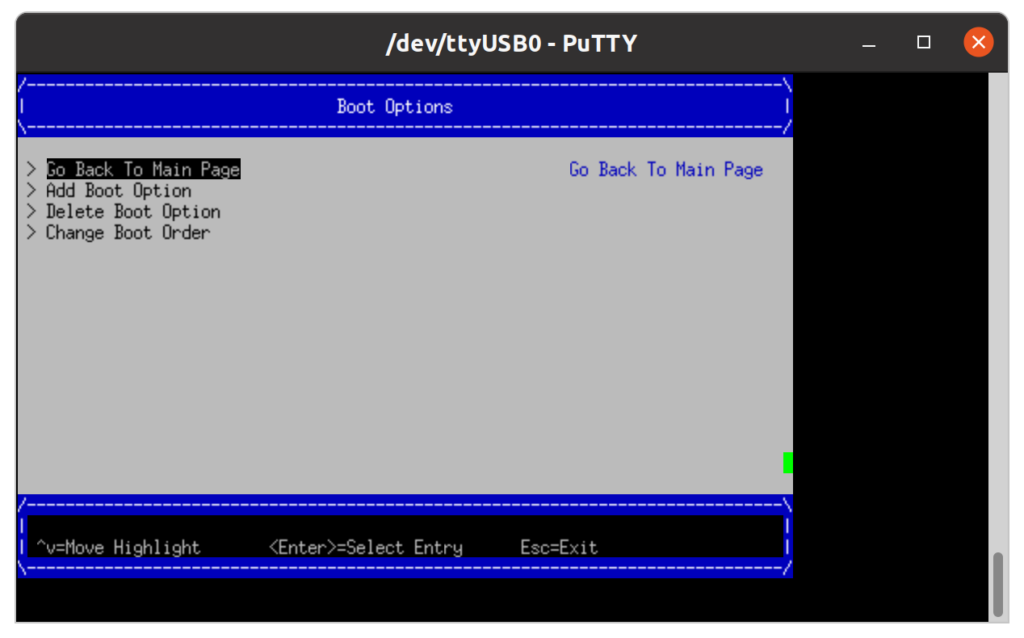
- Verify the Boot Options page is displayed
- Select "Change Boot Order"

- Verify the Change Boot Order page is displayed

- Press the ENTER key
- Verify the list is highlighted
- Press the Down Arrow key to select "<SATA SSD>"
- Press the "+" key to move the "SATA SSD" to the top
- Press "F10" to save the changes
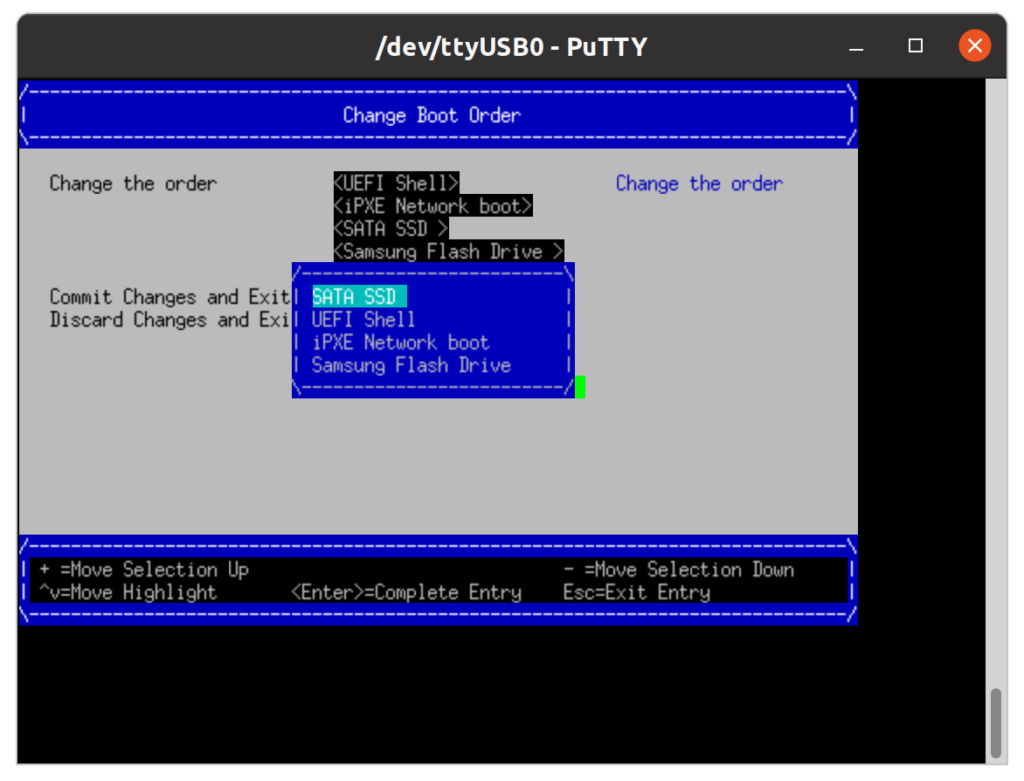
- Press the ENTER key
- Select "Commit Changes and Exit"
- "ESC" back to the main page
- Select "Continue"
- Verify the unit boots to the OS from the SATA SSD
Ubuntu Installation and Boot Order
Ubuntu automatically creates a boot label of "ubuntu" and puts it at the top of the list.

As always, if you experience any issues, feel free to contact Protectli support at: support@protectli.com