Have a Question?
How to Install Sophos on the Vault
Overview
Sophos Firewall Home Edition is a free version of the Sophos XG Firewall software. The home page is at: https://www.sophos.com/en-us/free-tools/sophos-xg-firewall-home-edition
To install it on the Vault, there is a relatively straight forward process that is very similar to installing any operating system onto any computer.
Note: Sophos does not support the i225 NICs found within the FW4C, VP2420, and VP4600 series
- Obtain the installation image
- Download software to transfer the installation image to a USB drive
- Install the new image
Verify Hardware Requirements
- Network interface cards: 2
- RAM: 4 GB minimum
- HDD or SDD: 10 GB minimum but recommended 64 GB
- USB pen drive: 1 GB
Install Sophos UTM
Obtain the Installation Image
The installation image can be downloaded at https://www.sophos.com/en-us/free-tools/sophos-xg-firewall-home-edition
- Fill out the forms at the prompts after clicking "Download Now"
- Continue to the download page, and verify that an email is received with evaluation serial number
- Click the Download button
- Fill out the necessary information and accept the EULA
- The download should automatically start
Your download should begin immediately, and when it is completed you should have an iso image with a name such as "SW-18.5.3_MR-3-408.iso" that is ~600MB in size. You will also receive an email with a license key. This will be needed when configuring the system via the web admin graphical user interface (GUI).
Transfer the installation image to a USB drive
The easiest way to transfer the installation image to a USB drive is by using software called "Rufus" on Windows or "balenaEtcher" on Apple OSX. See this link for detailed instructions on how to create a bootable USB drive using Rufus or balenaEtcher. The Sophos USB drive for this example was created using Rufus. When burning the image to your USB drive, select a "dd" image, rather than an "ISO" image in Rufus.
Install the Operating System on the Vault
Once the installation image is properly copied to the USB drive, it is ready to be installed on the Vault. Keep in mind that installing Sophos will completely wipe the SSD you have installed in the Vault. There is a good manual including detailed instructions for Sophos XG at https://docs.sophos.com/nsg/sophos-firewall/17.5/Help/en-us/webhelp/onlinehelp/PDF/sfos_ug.pdf.
*Important Note: There is no UEFI installation for Sophos, so it is vital to boot to the non-UEFI partition of your USB drive. Sophos cannot be installed on a VP2410 with coreboot.
- Insert the bootable USB into your Vault's USB 3.0 port
- Turn on the Vault and hit the F11 key to select boot device. Make sure to boot to the non-UEFI partition of your USB drive. (screenshot below for further context)
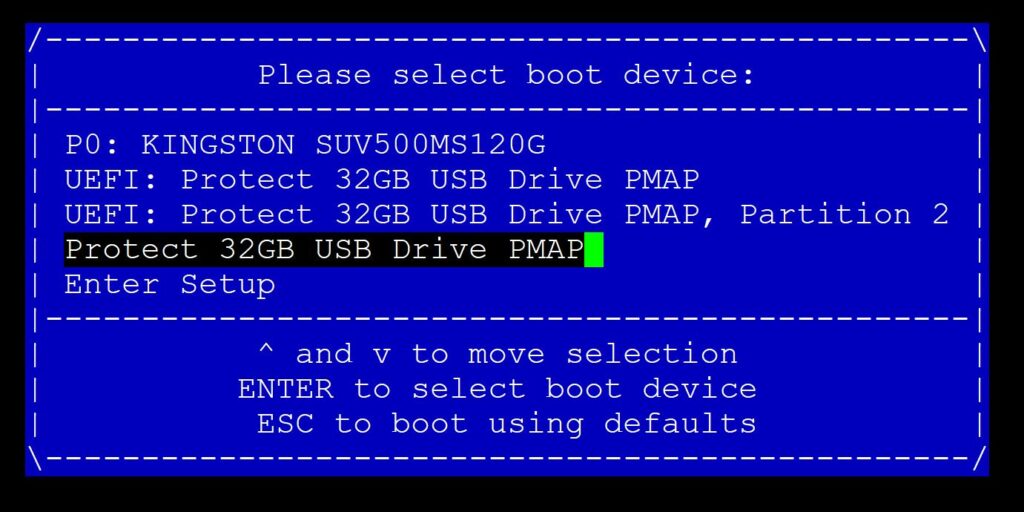
Booting to non-UEFI partition - Let the installation start
- You will be prompted to confirm the deletion of all data on the SSD. type 'y' and hit enter to confirm and continue with installation
Note: During the installation, the USB is unmounted but must be re-mounted to continue. The error message "install.tar not found" will show but can be fixed by remounting the drive, as shown here.
- The installation will automatically continue until competition. (You'll know it has successfully installed when you hear Für Elise playing through your beeper)
- Type 'y' and hit enter to reboot. Remember to remove your installation USB so it doesn't automatically load back to it
- The OS has properly launched when you see a prompt on the screen asking for a password
- You will need to access the Web GUI to change the password. To do this, you will need to connect the Vault to the WAN and to a computer via the LAN port
By default, the Vault's WAN and LAN port will be swapped in Sophos (ports 1 and 2). Therefore, on the FW2B/4B, and the FW6A/B/C/D/E, the port labeled WAN will actually be the LAN port, and vice versa.
- Connect the Vault to the internet via port 2, and then connect the Vault to a computer's LAN via port 1
*It may take a minute for the connection to establish - Open a web browser, and navigate to https://172.16.16.16:4444 (if you receive a message regarding an insecure connection/security risk, simply accept the prompt and continue)
- Accept the Sophos End User Terms of Use to start the setup.
- Create your default admin password
- In the third step, you can enter your serial number that was emailed to you earlier
- After you have finished setup, you can login using the password you created. The default username: admin
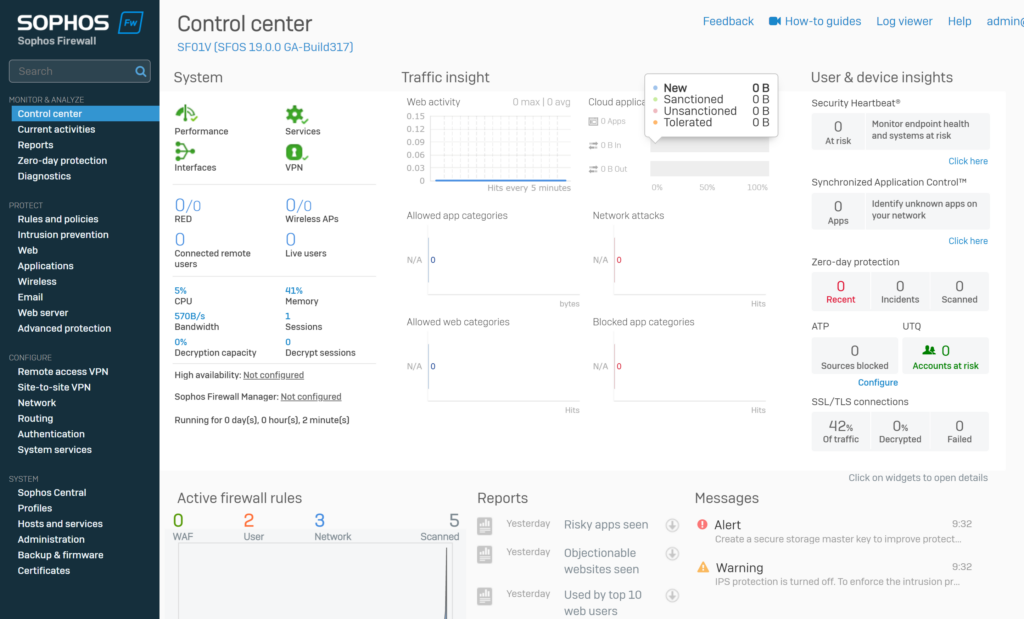
At this point Sophos XG Firewall is installed and can be further configured via the Web GUI. A screenshot of the Sophos XG dashboard is shown below.
At this point, Sophos should be up and running on The Vault. If you experience any issues, please feel free to reach out: support@protectli.com.
You can also visit the official Sophos documentation page here: https://community.sophos.com/sophos-xg-firewall/
System Compatibility
The table below shows the latest tested release of Sophos on each of the Vaults.
| Vault | UTM 9.506-2 | XG 19.0 (AMI BIOS) | XG 19.0 (coreboot BIOS) |
|---|---|---|---|
| FW2B | Tested | Tested | Tested |
| FW4B | Tested | Tested | Tested |
| FW4C | N/A | Failed | Failed |
| FW6A | Tested | Tested | Tested |
| FW6B | Tested | Tested | Tested |
| FW6C | Tested | Tested | Tested |
| FW6D | Tested | Tested | Tested |
| FW6E | Tested | Tested | Tested |
| VP2410 | Tested | Tested | Failed |
| VP2420 | N/A | Failed | Failed |
| VP4630 | N/A | Failed | Failed |
| VP4650 | N/A | Failed | Failed |
| VP4670 | N/A | Failed | Failed |
If you have any questions, feel free to reach out to us at support@protectli.com, or find more information in our Knowledge Base.