Have a Question?
How to Configure a PXE Server on CentOS 7 with pfSense® CE
How to Configure a PXE Server on CentOS 7 with pfSense® CE
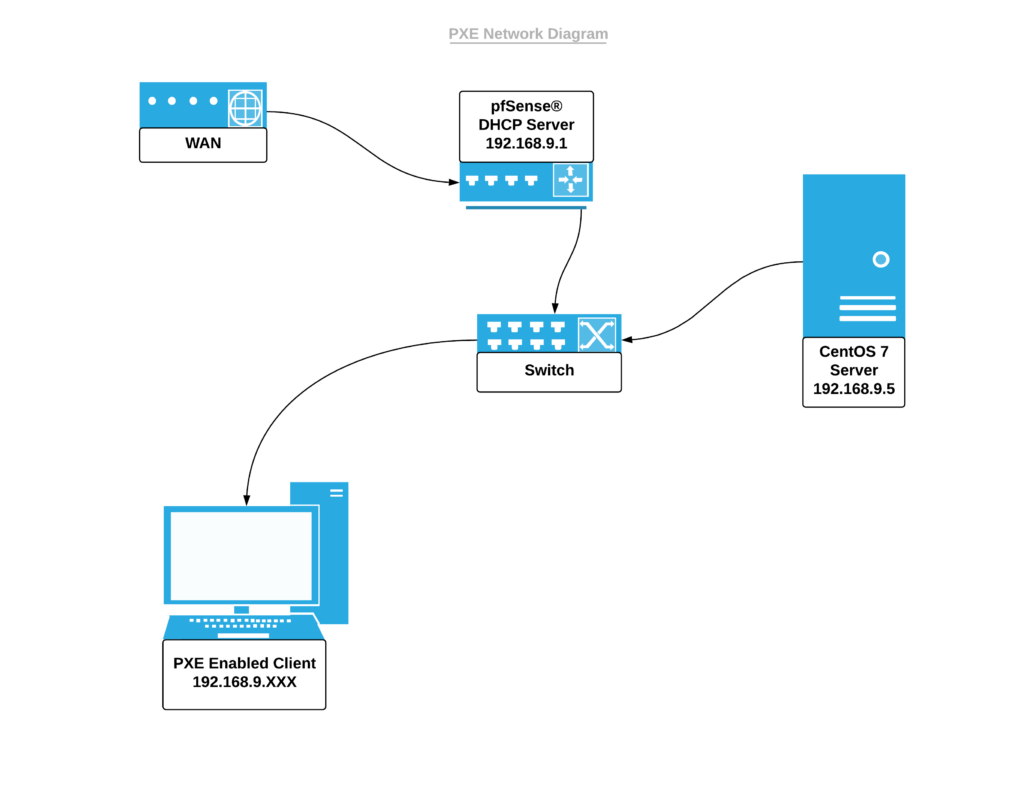
PXE (Preboot Execution Environment), allows for remote clients to boot from a network hosted image. In this article we will be setting up a PXE server on CentOS 7 with a pfSense® router in place. All models have PXE capabilities with AMI BIOS, please see our KB article here (link) to enable this feature. Vault models FW2B, FW4B, and all versions of the FW6 can be flashed to coreboot which has PXE capabilities.
We have guides covering how to install CentOS, pfSense® CE and how to flash coreboot on to the Vault.
Example Setup
For this example we will be configuring a CentOS 7 server for hosting PXE files along side pfSense® running the DHCP server to allow for network boot and install of CentOS 7 on a FW2B flashed with coreboot.
- FW6C – Hosting a virtual machine of CentOS 7
- FW4B – Running pfSense®
- FW2B – coreboot flashed for PXE
Prerequisites
For this guide we will assume the following are in place:
- PXE enabled client
- CentOS 7 Server
- pfSense® router with DHCP enabled
Setting Up the PXE Server
- Log into the CentOS 7 server
- Verify all the packages are updated using the following command
#yum update -y- Install the required packages using the following command
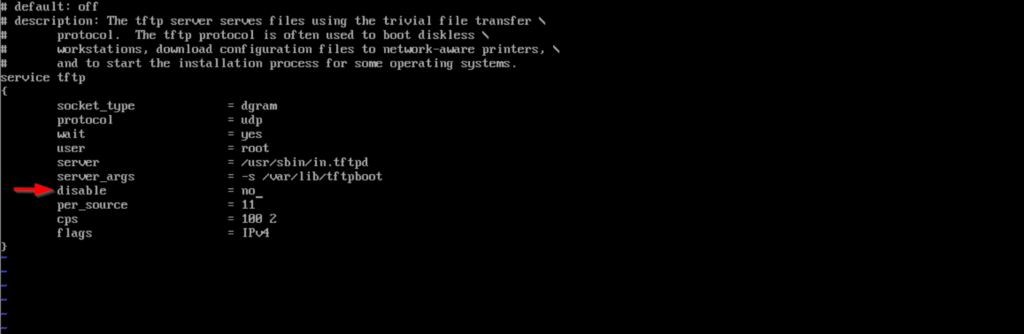
#yum install syslinux xinetd tftp-server vsftpd wget -y- Edit the TFTP configuration file with the vi command
#vi /etc/xinetd.d/tftp- Change disable from yes to no.
- Tips for vi editing: Press 'Insert' on the keyboard to edit the file, 'Esc' to exit edit mode, and type ":wq" to write and close the file.
- Change directory to syslinux and copy the necessary files to the TFTP
#cd /usr/share/syslinux
#cp pxelinux.0 mboot.c32 menu.c32 chain.c32 memdisk /var/lib/tftpboot- Make and change to the tmp directory.
- Download a CentOS 7 image. The following address is for a minimal image, but you may find your own mirror and version
#mkdir tmp
#cd tmp/
#wget http://mirrors.sonic.net/centos/7.9.2009/isos/x86_64/CentOS-7-x86_64-Minimal-2009.iso- While in tmp mount the downloaded image and copy the files to the FTP directory
#mount -o loop CentOS-7-x86_64-Minimal-2009.iso /mnt/
- Make a directory for the image files and copy them over
#mkdir /var/ftp/pub/centos7
#cp -rf /mnt/* /var/ftp/pub/centos7
#chmod -R 755 /var/ftp/pub/centos7- Make a directory and sub-directory called networkboot/centos7 and copy over vmlinuz along with initrd.img
#mkdir -p /var/lib/tftpboot/networkboot/centos7
#cp /var/ftp/pub/centos7/images/pxeboot/{vmlinuz,initrd.img} /var/lib/tftpboot/networkboot/centos7- Create a PXE configuration file that points to the correct files
#mkdir /var/lib/tftpboot/pxelinux.cfg
- Make note of the IP address for the next steps. Use the following command to show IP address
#ip a- Open the PXE configuration file with the vi editor
#vi /var/lib/tftpboot/pxelinux.cfg/default- Add the following lines to this new configuration file. Screenshot below is an example of what it should look like.
default menu.c32
prompt 0
timeout 60

menu title <insert title>
label Install CentOS 7

kernel /networkboot/centos7/vmlinuz
append initrd=/networkboot/centos7/initrd.img inst.repo=ftp://<server_ip_addr>/pub/centos7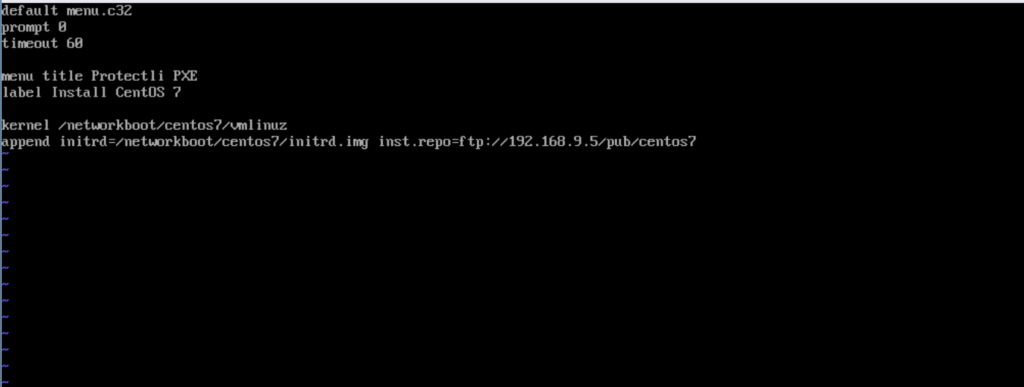
- use ':wq' to save and exit the editor
- Enable and start the TFTP and FTP services
#systemctl enable vsftpd.service
#systemctl start vsftpd.service

#systemctl enable tftp.service
#systemctl start tftp.service- Add firewall rules for the TFTP and FTP servers
#firewall-cmd --permanent --add-service=tftp
#firewall-cmd --permanent --add-service=ftp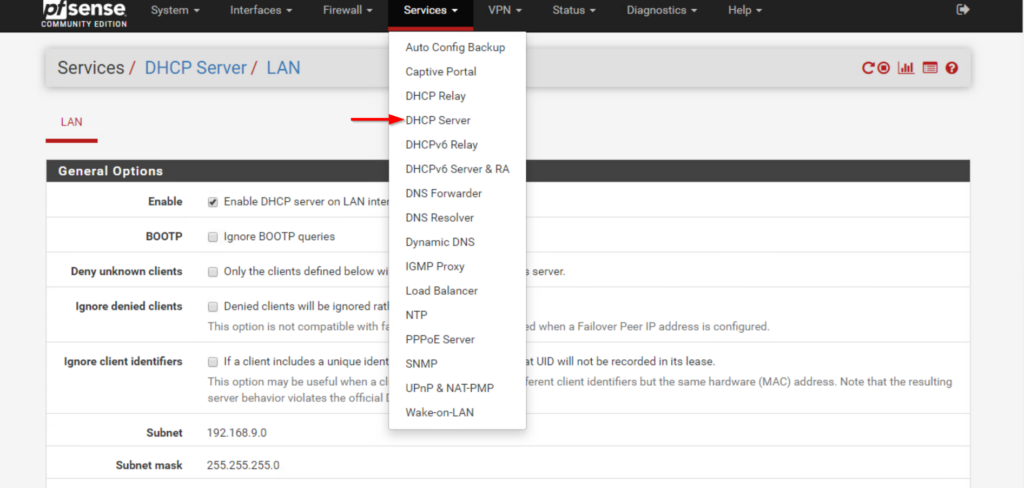
#firewall-cmd --reload- Log into your pfSense® webGUI and locate the DHCP Server menu under the Services tab
- Scroll down to "Other Options" and fill in the TFTP server IP address
- Verify the "Enables network booting" box is ticked
- Enter the IP address of the Next Server (same as TFTP)
- For "Default BIOS file name" enter pxelinux.0
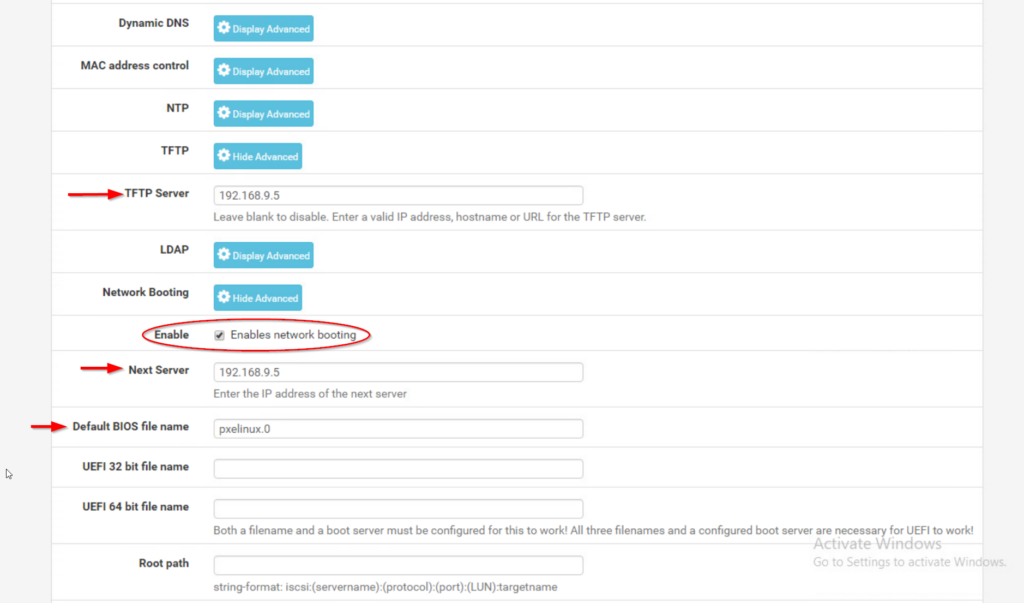
- Click Save
At this point you can boot up the PXE client and verify that it lists the image and network installation functions.